Thank you to my loyal followers and readers of my original blog.
I have made a new website and will be migrating and posting content through there.
Please visit: www.justbonsai.com

Thank you to my loyal followers and readers of my original blog.
I have made a new website and will be migrating and posting content through there.
Please visit: www.justbonsai.com

After having seen several nice magnolia bonsai in Japan, both in publication and in person, they’ve become among my favorite species for bonsai cultivation. I was a bit sad to leave behind my previous magnolia project in Japan, but it’s in good hands and will develop into a great tree.
It’s rather difficult to find nice magnolia material stateside other than growing it yourself. The wood is soft and rots easily, while also being susceptible to fungal problems. Massive chops are not a great idea–rather using sacrifice branches in a series of stages to heal a large wound is preferable. If you follow me on Facebook as well as my previous blog post you can see what I’m talking about.
In search of new material, last spring I climbed up my parent’s magnolia tree to set an airlayer on older wood. With help from my parents the layer was periodically “jet hosed” and kept moist in the canopy of the tree. It was a bit slow to root and after having some intense summer heat waves, I opted to leave the layer on for a few more months. Last month the layer was separated with no issue and a healthy set of roots.


With a long characteristic drop branch, thick callousing, and some hollows it has a bit of a wild characteristic to it.
For the upcoming spring, I’ll repot the tree to clean out more of the spagnum moss and to remove some of the wood beneath the layer line. Cut backs won’t happen until after the tree flushes out. If I were to cut back hard during the winter, the remaining buds would have too much energy resulting in vigorous and coarse growth. Allow the tree to allocate energy over a greater surface area, then cutting back will help me produce finer branching and growth.


Producing fine branching and leaf reduction is achievable on magnolia with deliberate fertilizer use, lots of sun, and knowing when to cut back. Avoid over fertilizing, especially with nitrogen heavy ferts in the early spring as growth is emerging. Fertilizing more so after the growth has hardened off will ensure finer more usable branching (in the case of refinement).
A short post, but good to write on the blog again! Excited to develop this magnolia and I think it can become quite nice in the future!
After much consideration I’ve decided to head back to the states. I have carefully discussed with others as well as spent significant time assessing my own thoughts to come to this decision.
Everyone’s apprenticeship experience is different and it’s hard to assume a single mold , model, or stereotype of what it is, what one’s experience should be, and what they have difficulty with.
I am grateful to have had the experience to hone my talents and improve my skills. I have no regrets and I can confidently say I did nothing other than my best for my duration here.
Of course, there are still many things I lack for me to learn and to gain experience in. I understand how deep the breadth of knowledge bonsai encompasses and will seek to further my knowledge and skill.
I am grateful for the support I’ve received, and some kind members of the bonsai community who check on me on occasion and offer help.
As far as what comes next, I’m not too sure myself. On this blog I have been very transparent on my development from an hobbyist to the last 2 years, as an apprentice.
Although my skills have rapidly advanced the past 2 years, I can acknowledge and recognize that I still lack a lot of knowledge and experience necessary to become a “full fledged” professional.
I want to pursue bonsai to my highest ability. I want to stay true to myself. I want to be able to support myself and those I care about around me. I am not abandoning my path, but certainly this is a detour if any.
I’ll be back in the states next month. I need some time to assess my options and save some money.
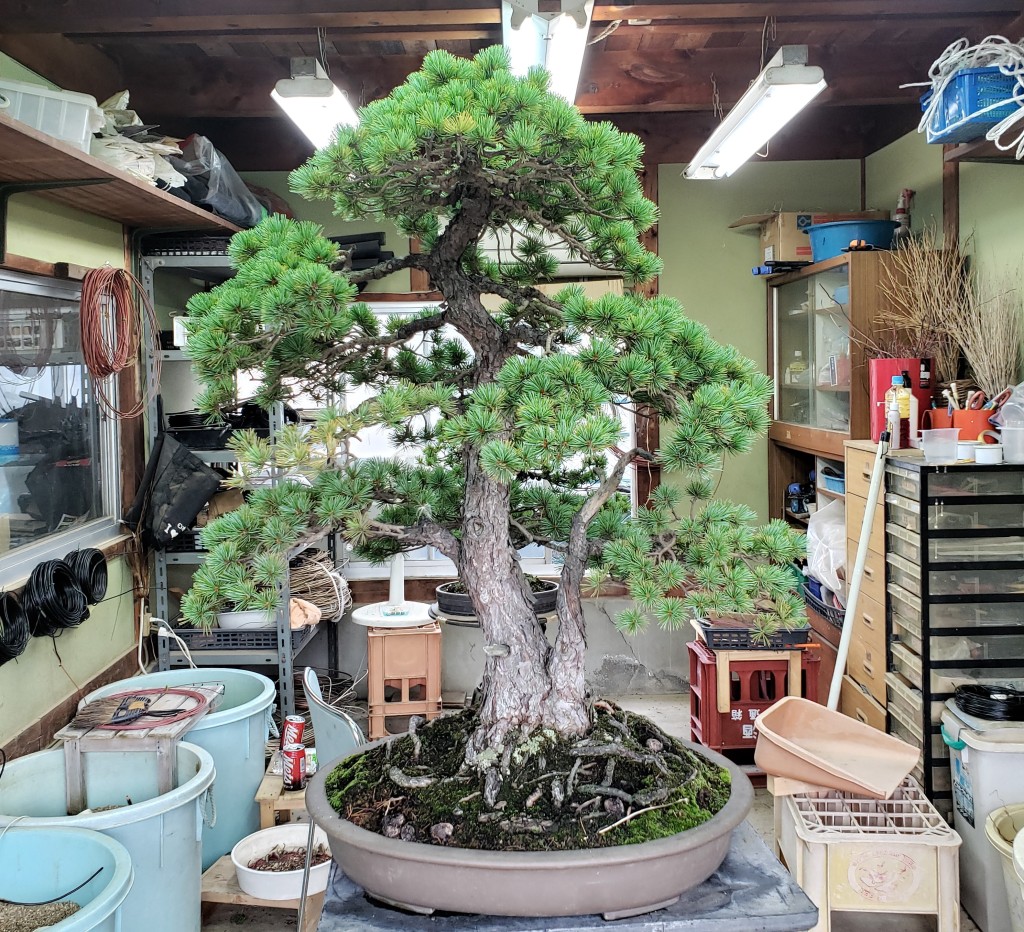
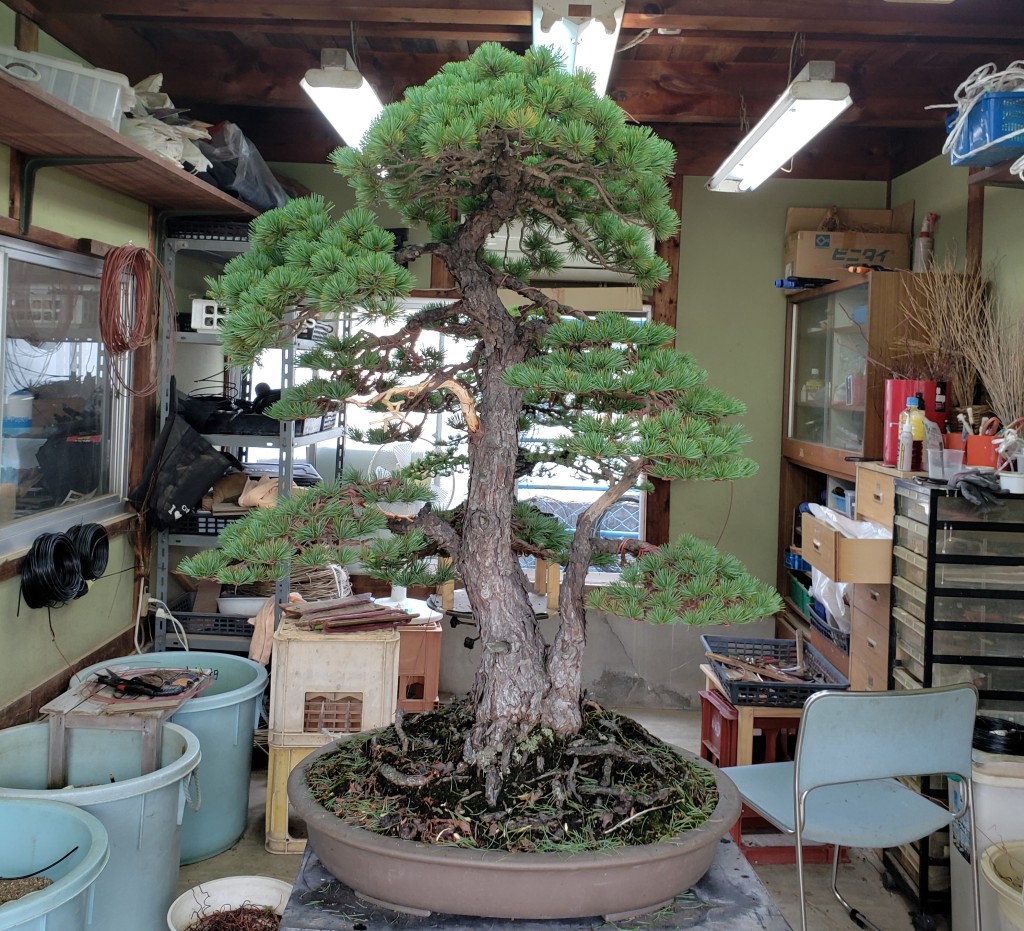
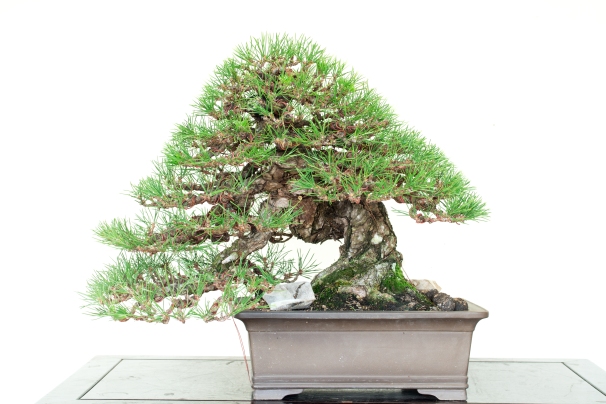
Lastly I wanted to share some pine work I’ve recently completed. They both came out fairly clean and I am content with the results.
I was debating removing the lowest branch. With a left moving trunk and the tree flowing back to the right you get a more dynamic design.

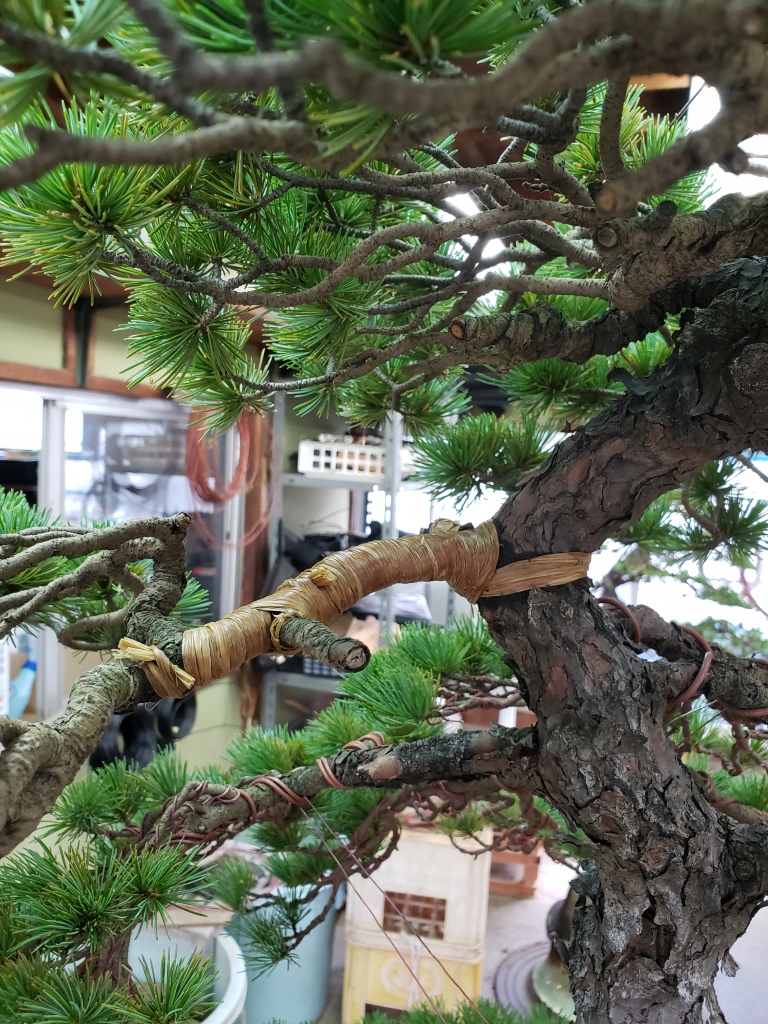
There was too much disconnect between the foliage and the trunk. In order to create a more powerful tree and to lose the disjointed feel, I compressed the trunk. A bend was already in place so it was fairly easily to push it further. Unfortunately the screws and wire I had on hand were not strong enough to hold the bend. I relocated the anchor screws onto a large jin and directly into the deadwood.

Lower branches set.

Since pulling the right side of the trunk down lifted everything on the left side, I had to compensate with guy wires hidden around the back and left side of the tree. Overall the design was able to be compacted quite a bit.

Done!

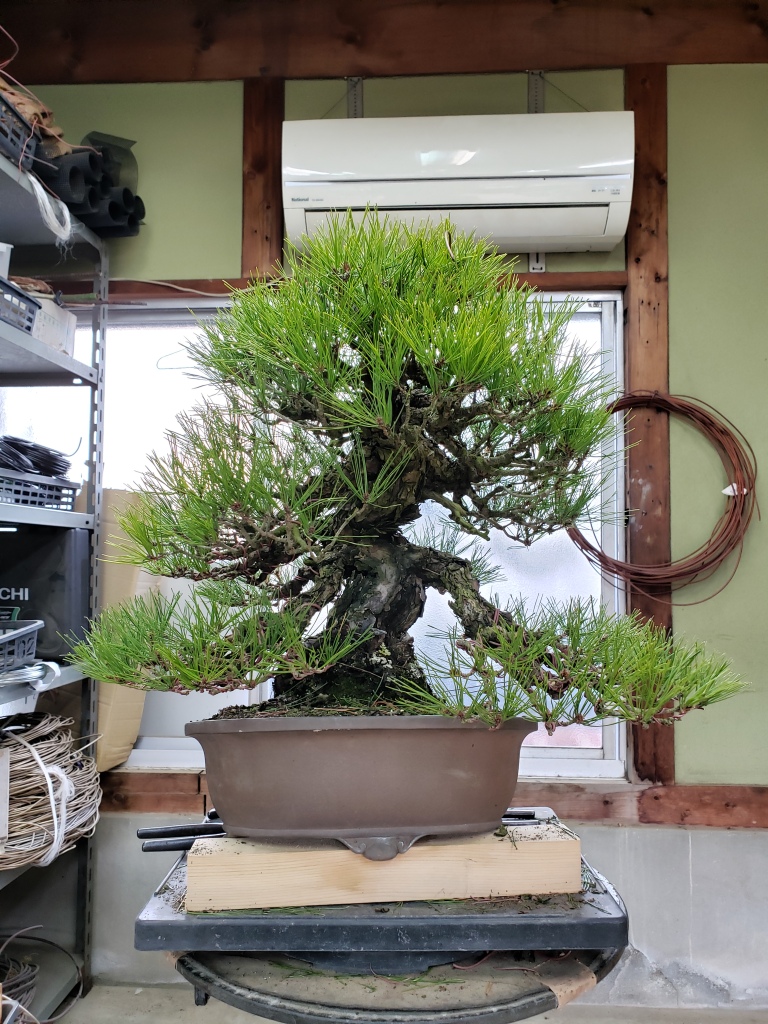
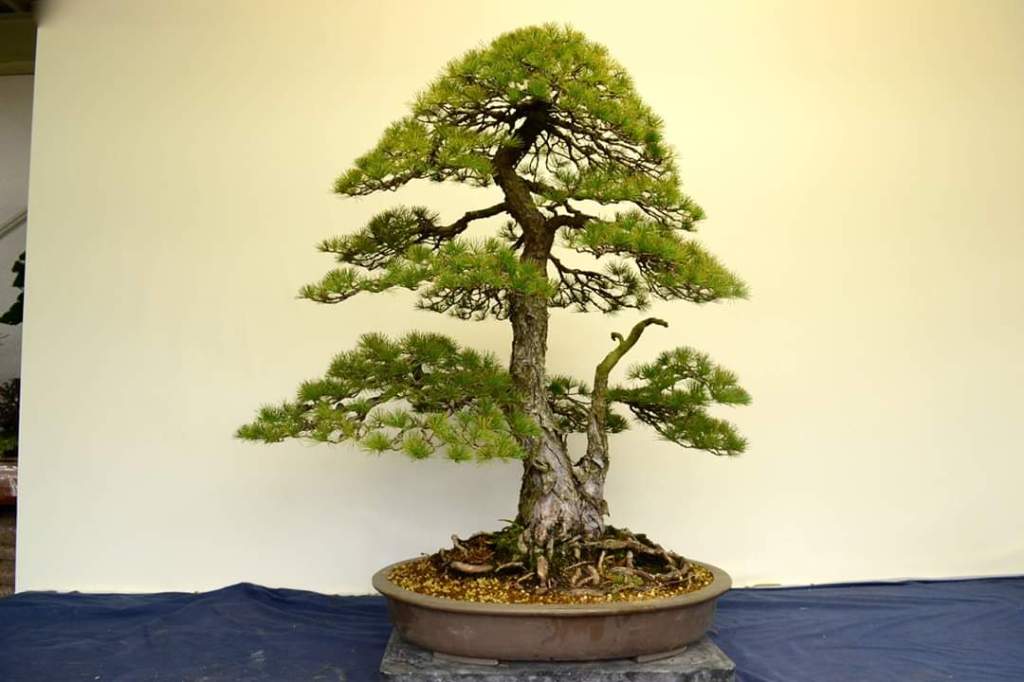
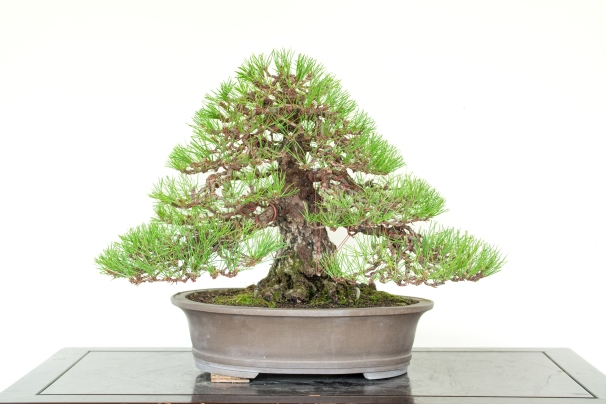
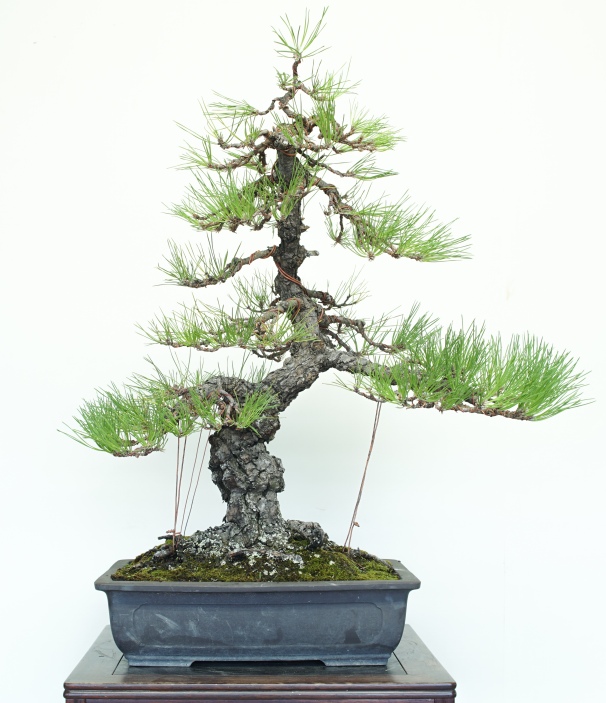
Here’s a red pine I styled as well. The goals with this tree was to clean up the pads and design–meaning necessary branch cuts/thinning as well as pulling all the old needles. After doing so the entire tree could be wired.


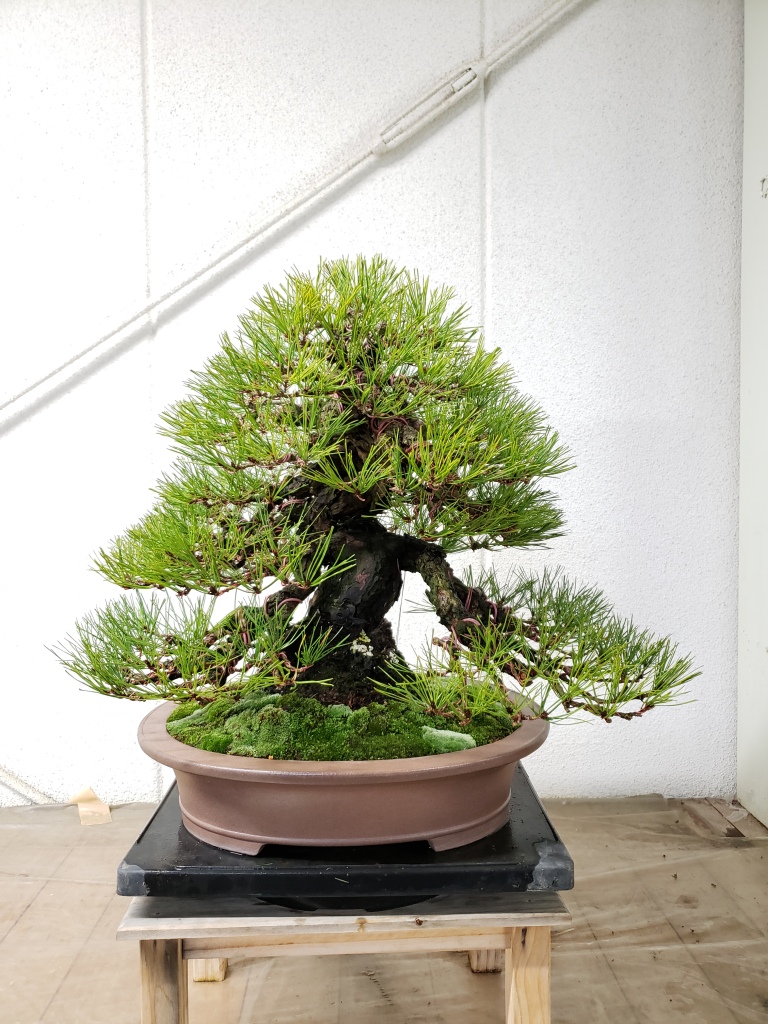
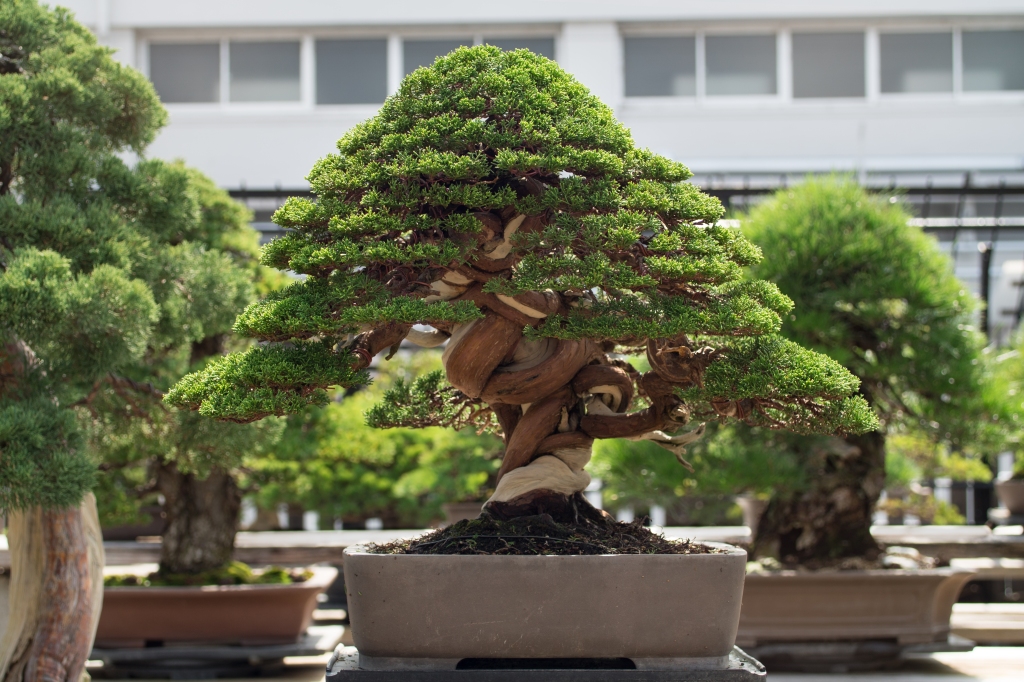
Done! Repotted in a lightly larger container and roots slightly worked to accommodate for angle change. Looks a little messy in this photo with needles stacked over each other, but it turned out really clean in person! These 2 trees will be available for sale at Kokufu.
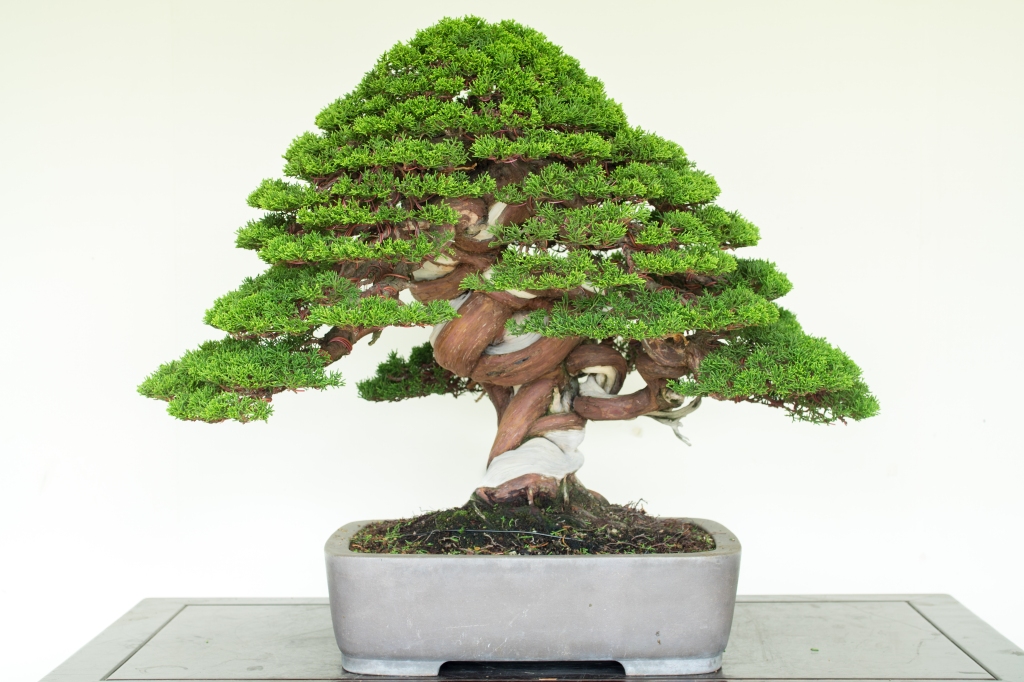
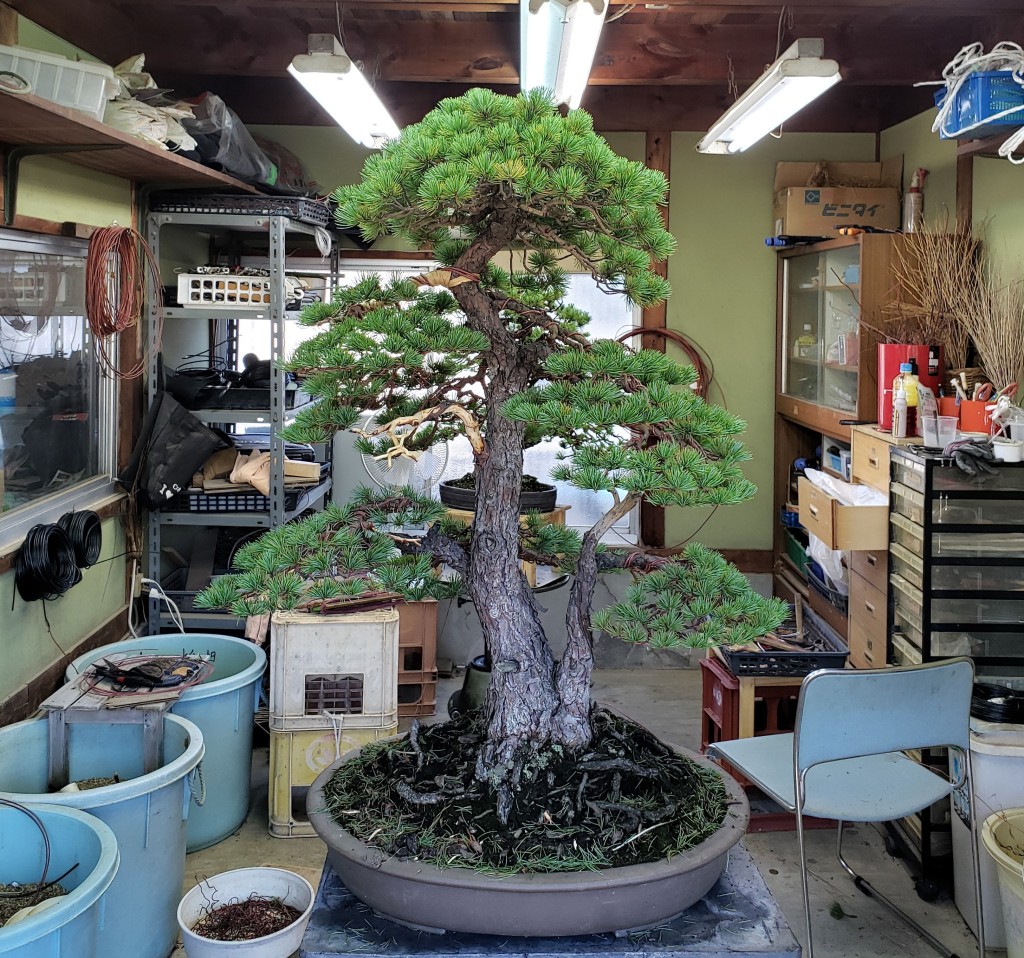
Recently Oyakata gave me a nice itoigawa shinpaku to work on. It came from one of our long time clients. He recently decided to part with a large portion of his collection which we are now selling on his behalf via consignment. In order to prepare the trees for sale and to hopefully raise the value, we’re touching up and restyling many of them.
I believe this tree is actually old field grown material, not yamadori. The twisted trunk is quite interesting and powerful and it was my intention to show it off more in the restyling. For more refined material like this, the shape and the rough design of the tree is effectively set. The goal is just to bring out and refine what’s already there.
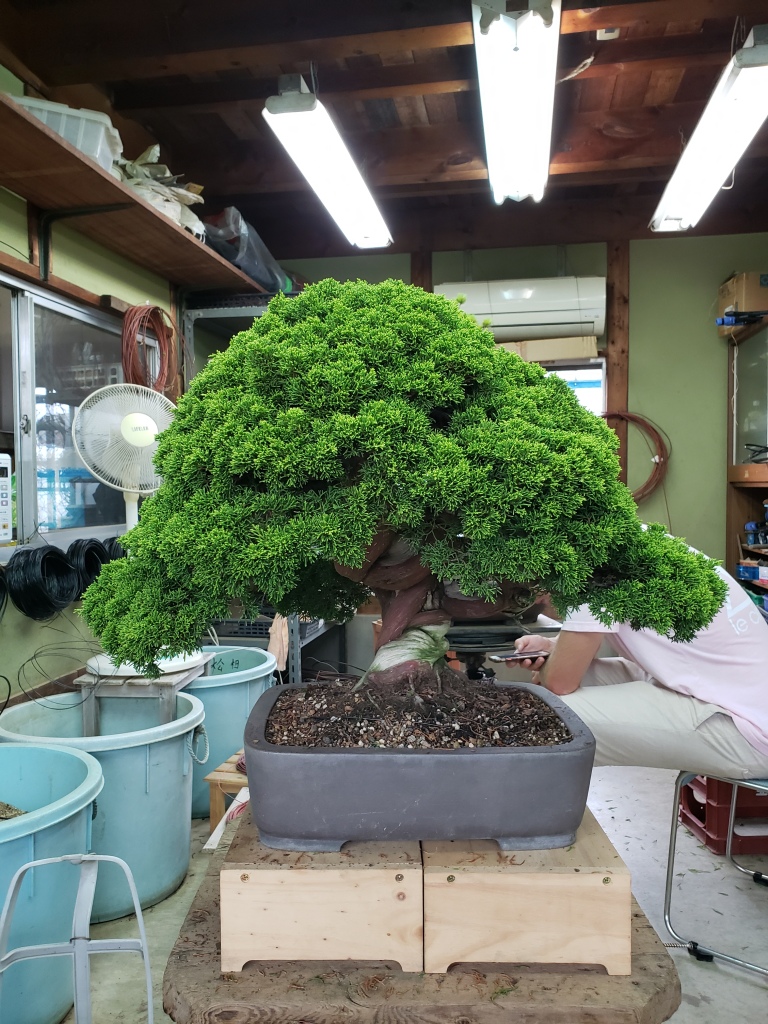
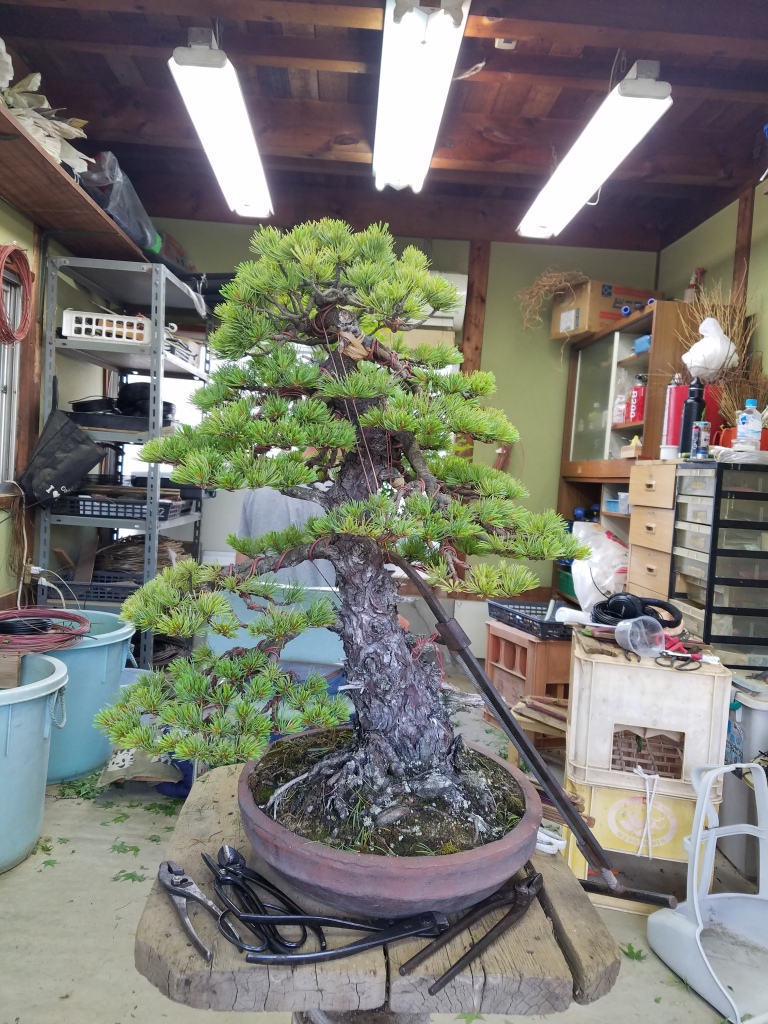
The tree is quite healthy and full, but a lot of the good features are lost underneath the thick green crown. Prior to wiring, and in order to assess what can or can’t be used we start by cleaning the foliage. I start by removing downward growth, crotch growth, and overcrowded branches (3 more more branches from the same node). I work in steps until I am left with only the branches essential to the design.
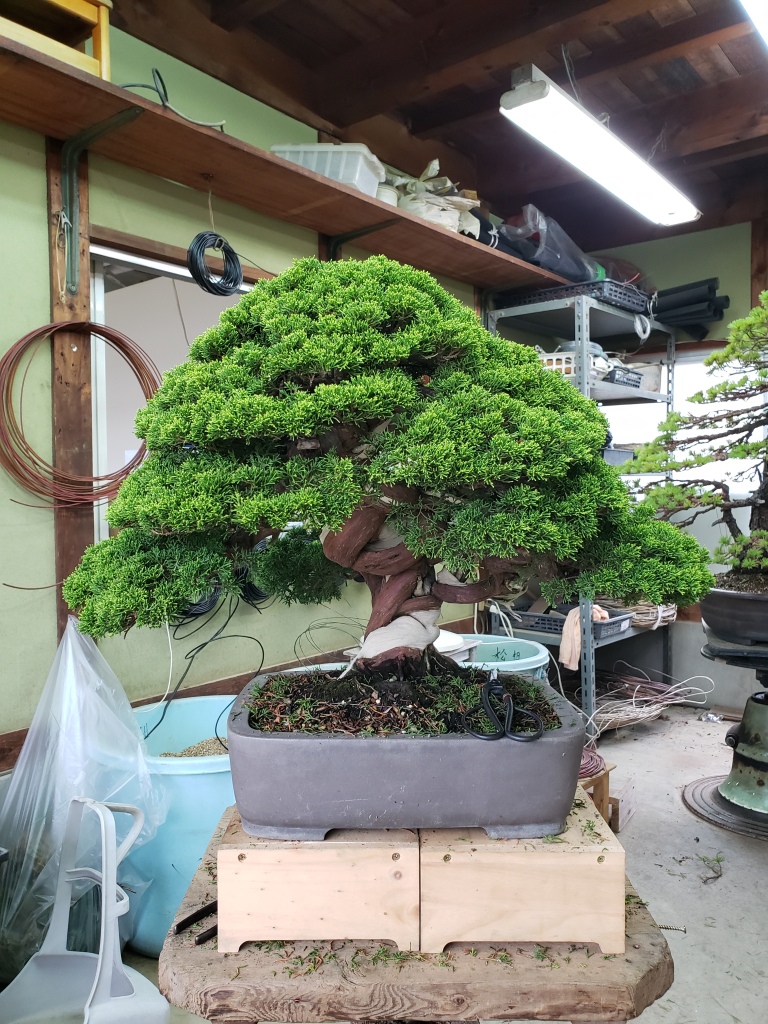
At this stage I did all the “obvious” work I mentioned earlier. It still feels quite heavy and I know more branches will end up being cut for the final shape. I told Oyakata that I felt the second pad (left side) was quite heavy. I wanted to cut out a thick branch and he agreed and advised me to do so. Oyakata also told me to cut out another branch further up the crown. Doing so would help “lighten” the crown more and expose the trunk.

I did not take a photo at this stage, but the areas in red were cut. Branches from opposing sides were pushed together to close the gap. A thick primary branch was exposed after removing the upper red region. To accentuate the movement of the exposed branching, I added a little shari. It’s subtle, but adds more interest.

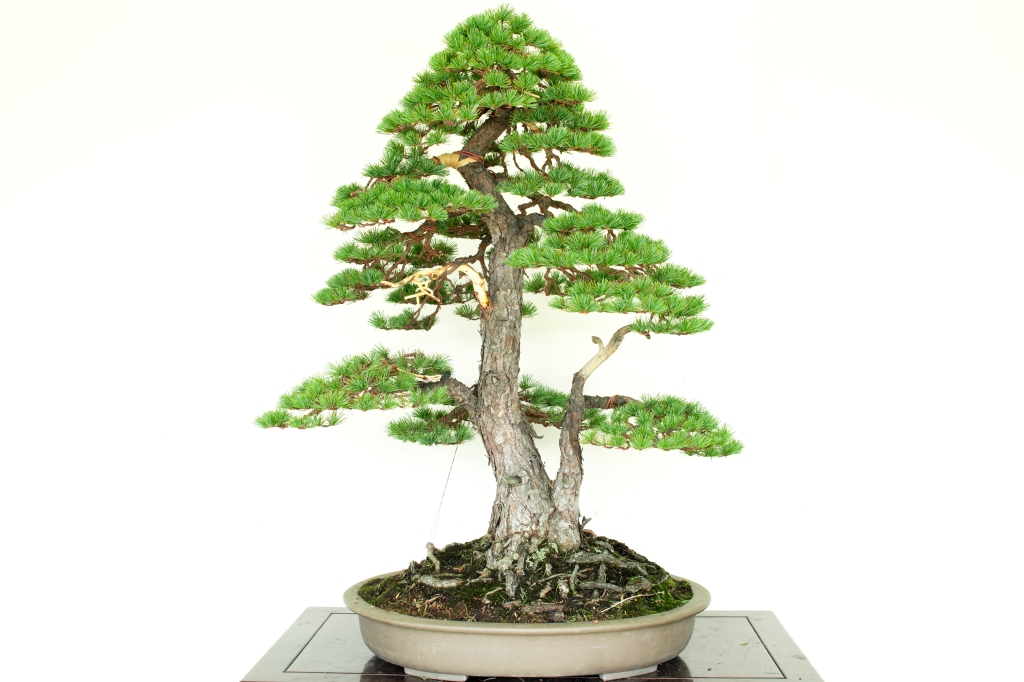
With all the major cleaning and cut backs done I went ahead and wired the whole tree. My goal was to compact everything, break up heavy foliage masses into smaller sub pads, and to lighten up the crown. Doing so would make the tree feel more powerful and highlight the trunk which is the best feature of this tree.

Since the overall orientation of the branches are set already I didn’t have to use any really heavy or thick gauge wire. I used a lot of small guy wires I hid in the branching to drop primaries then focused on wiring the branch from the secondaries out.

Overall it was a fun tree to work on and different than my previous projects.
From my perspective there are 2 major influences that determines a tree’s design. First from the tree, and second from the “artist.” In the former we can take qualities or attributes of the tree (think movement, trunk) as “suggestions” that aid us in design or what to build the tree around. In the latter we impose what we value as an artist on the tree, and through techniques and time achieve the result. I think to make good bonsai you need to balance the two.
The summer season at Kouka-en has been quite slow. Unlike the stressful intensity of the Kokufu period or the physical strain of repotting season, summer season here is a marathon. The persistent humidity, intense sun, and for me, an endless stream of mosquitoes put a damper on my energy. During this period, we’re neither acquiring nor selling many trees with most of our customers doing business during show season. In short this makes for lots of watering and long muggy days in the workshop. Aside from the occasional visitor or customer there are a significant amount of days in the summer where apprentices at Kouka-en are working by themselves. The isolation plays twofold, from the greater Japanese society, but from the bonsai community here as well. With Oyakata not around often, I feel a sense of responsibility not only to make sure things run smoothly but also to improve my Japanese more as well. Prior to and when I first arrived in Japan I’d regularly study 3-5 hours a day in an effort to grind and expedite my learning. My Japanese situationally has become decent, but overall lacking in many areas. Admittedly, as of recent, I have been neglecting this as the lack of Japanese people to talk to at the nursery and my own mental state of mind has made it hard to practice and study.
From a combination of unusual circumstances here as well as some personal problems I’ve been dealing with, its been a hard summer for me with bad depression and insomnia. I’ve taken up running and I frequently do 5-10k runs at 6:00 AM before I show up at Kouka-en, or in the evening. It’s given some balance in my schedule and has allowed me to focus my energy on something I have control over.
I think about it often–what it means to pursue bonsai and to “follow my dreams.” Ultimately it’s a selfish pursuit, borne out of a consuming passion and desire to immerse myself in the art. Equally, bonsai should be something that brings people joy. It’s truly an art that can be appreciated irrespective of background or culture. I think about this often and envision the kind of career and community I want to build. How bonsai can not only improve my life, but the people I meet around me? I don’t have a firm grasp on it yet but the thought weighs in the back of my mind. For now I just do what I can, take it day by day, and always strive to my best.
I’ve been overall quite transparent about my apprenticeship life as well as my own work. I hope as I share my progress and my mistakes, people can learn from them as well. As I improve my own technique, I plan to write some educational articles regarding styling and setting a design. Over this summer I’ve styled quite a few white pines, some shinpaku, and a black pine. At this stage of my apprenticeship I get a wide array of projects. Some nice stuff that just needs detailed wiring to restore a silhouette, but also neglected overgrown or “problem” trees that need to be re-evaluated or drastically changed. I learn a bit each time, but also through experience realize the gaps in my knowledge.
Here is the last tree I styled. A chuhin sized zuisho white pine. The tree had quite small needles, an abundance of small branching. Both good attributes for a “medium to smaller” sized trees. Arguably, creating good and convincing “small” trees can be much harder than styling and creating larger bonsai. This is because branch placement becomes much more critical to the design. In a larger tree we have more flexibility in design in terms of the number of components (like foliage/branch pads) that make it up. But for a smaller tree, the same branches and pads occupy a much greater volume of the collective silhouette of the tree. It’s like building a Lego house from red builder bricks (exaggeration). Of course by utilizing species or dwarf varieties with naturally smaller foliage or obtainable tight internodes we can stretch the limiting factor and create convincing smaller trees.

Initially Oyakata’s request was to make “large” clean pads and layer them to create the silhouette. I was able to do this for the bottom primary branches and some of the back, but I really struggled to create fuller pads in the mid to top sections. Since this tree had been growing unrestricted essentially as a bush for many years, lots of interior growth had died back. Oyakata refers to inside branches as futokoro “ふところ” and for all bonsai, keeping the futokoro alive is important for design sustainability and depth.
Fuller pads on the bottom, but as you move up the tree they get progressively thinner. I ended up stacking thin single lines of foliage to create the silhouette but overall the tree is lacking clarity and structure aside from the outer shape. Creating the double apex was a bit of a challenge for me as well without prior experience in creating one. Overall it came out decent, but I know my work could be cleaner and the design can be improved upon in the future. Fortunately zuisho backbuds readily and there are already an abundance of backbuds on this tree. As the backbuds fill in, I would want to reduce the number of primary branches on this tree and have fewer but fuller foliage pads. This will make the tree look cleaner and create more structure instead of a collective foliage mass filling a silhouette.

Here’s another white pine I styled. It’s a client owned tree currently on consignment at Kouka-en. It was really healthy when I worked on it, which is a great plus, but too much so. Branches were really thick and strong and the apex was nightmarish with a thick whorl of fused branches. The goal was to cut out and eliminate as many of these thick branches as possible and restyle the tree using softer finer growth.


After cutting out lots of branching and putting on some wire this is the result:
This next white pine is maybe my favorite tree I’ve styled so far. As learning apprentices our practice projects also include neglected trees that never sold or had some past issue like losing primary branching. As “low value” trees in the nursery they provide learning opportunity for apprentices at minimal financial risk to our boss should we mess up or do a poor job. This white pine was one such tree. It was styled in Kouka-en by a previous apprentice around 2013 as “practice” tree too. At some point unfortunately the tree lost many branches and aside from maintaining the tree no work was really done for many years.
Much of the original branching and design was lost but it also made for a great opportunity to re-evaluate a new one. Before styling a tree I always set a criteria or goal I want to work towards. At quick glance these were the obvious issues I needed to address:
1) Establish a silhouette
2) Bring down branches in the top to create an apex
3) Break up heavy foliage masses
The first criteria was the most challenging. Since a lot of the primary branches in the front were dead or sparse, it was important to utilize back branches to create depth. You can’t always just swing branches from the back to the front. Doing so can look contrived and you also sacrifice how the back of the tree looks as well. Bonsai is multi-faceted so it’s important to consider how a tree looks not just from one angle. Basically I needed the back branches to look good from the front too!
The second criteria is more obvious. Generally speaking as we move up the tree we want to see less of the trunk. This means to bring down branches and to draw them towards the front.
Lastly were to address the big clumps of foliage currently comprising the tree. Wiring them into big massive pads would feel unbalanced and you’d lose interest in the design. Instead it was important to break them up in smaller sub pads.
The major challenge after this part was addressing the massive primary branch in the upper left. Overall it’s quite an undesirable branch. Thick, heavy, and also too long. Unfortunately there was no finer growth to cut back to. To reduce the length of the branch and to bring foliage closer to the trunk, I applied raffia then did two large bends. First to swing the large branch towards the back, close to the base of the branch. Second, from the midway point, to swing it back forward. This compresses the branch and visually, from the front, the length is effectively shortened.
After this it was ez pz with relatively simple apex work.
Overall it was a fun tree to style and felt good to come up with a new design.
I finally got to work on some nice shohin shinpaku too. It was a big contrast from the large shinpaku I styled and shared on my last post:


In the previous tree the goal was to establish a design, but for more refined trees the goal is to restore it. The work is a little different and something I lack experience in.
It was a hard tree for me to wire with the abundance of small branching. I think my work could definitely could be cleaner, but I’ll improve with successive trees.


Well that’s it for now. I know an update has been long overdue and I’ve been putting off for awhile. Quite frankly I am not doing too well, but I’m hoping the changing season and Taikan-ten prep will change the pacing and mood of things.
Thanks for taking a read and feel free to leave any comments of feedback! I know my blog posts are infrequent but I regularly post on my Instagram and Facebook so be sure to follow me there!
I’m soon approaching my 1 year mark of my apprenticeship in Japan. I recently took a brief visit to California last month for some work and to see family and friends. It’s given me some time to review my thoughts and feelings of my time invested so far. I wanted to be open and honest with both the excitement and growth I experience here, but equally the stress and difficulties I face.

Bonsai undoubtedly is my greatest passion. It’s something I absolutely love and has served as a form of meditation and healing during stressful times in my past. While I have doubts of whether my decision was the right choice, I absolutely do not regret it as I made it myself. To that end I am grateful to members of the bonsai community who encouraged me and the family that supports me being here.
Being in an immersive environment, naturally, has allowed me to hone down and really accelerate my skill and knowledge in bonsai. Bonsai is union of art and horticulture, and can’t exist without both. On one end I am pursuing aesthetics, learning how to style trees to create aesthetically beautiful and balanced shapes. On the flip side we have horticulture, knowing how to keep the tree healthy and the techniques to sustain the design we created. I have been very open about the work I post as a means to document my progression in skill and to share it with others : https://bontsai.com/work/
My last shinpaku I’ve styled in my apprenticeship:

Last white pine styled:


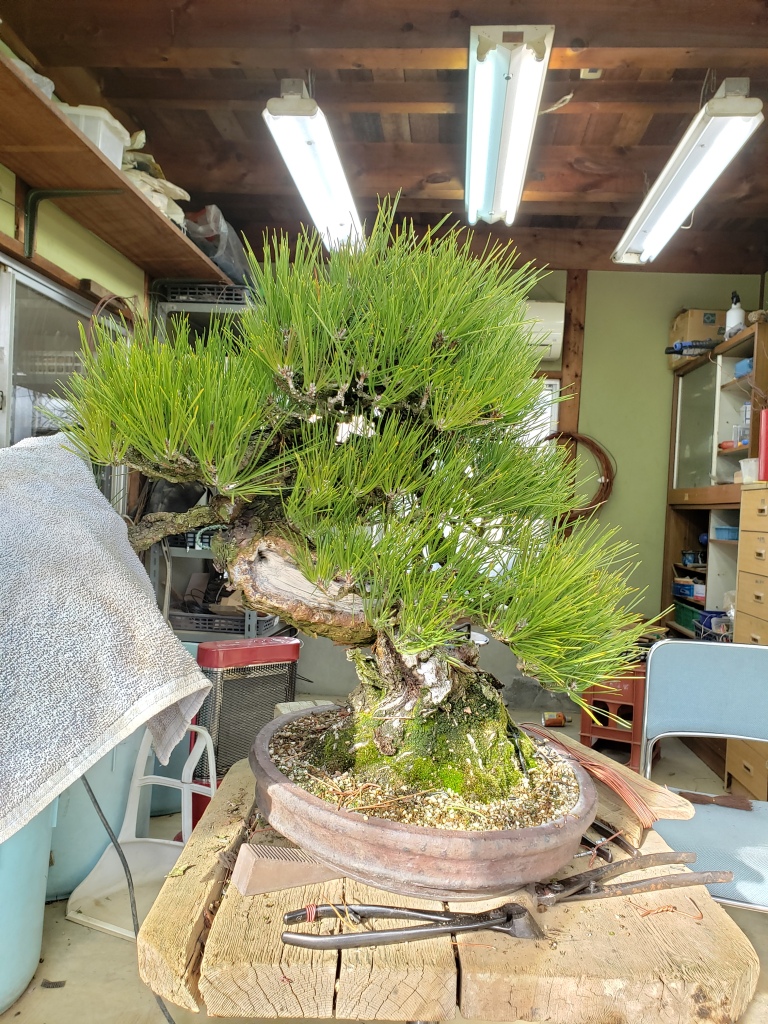
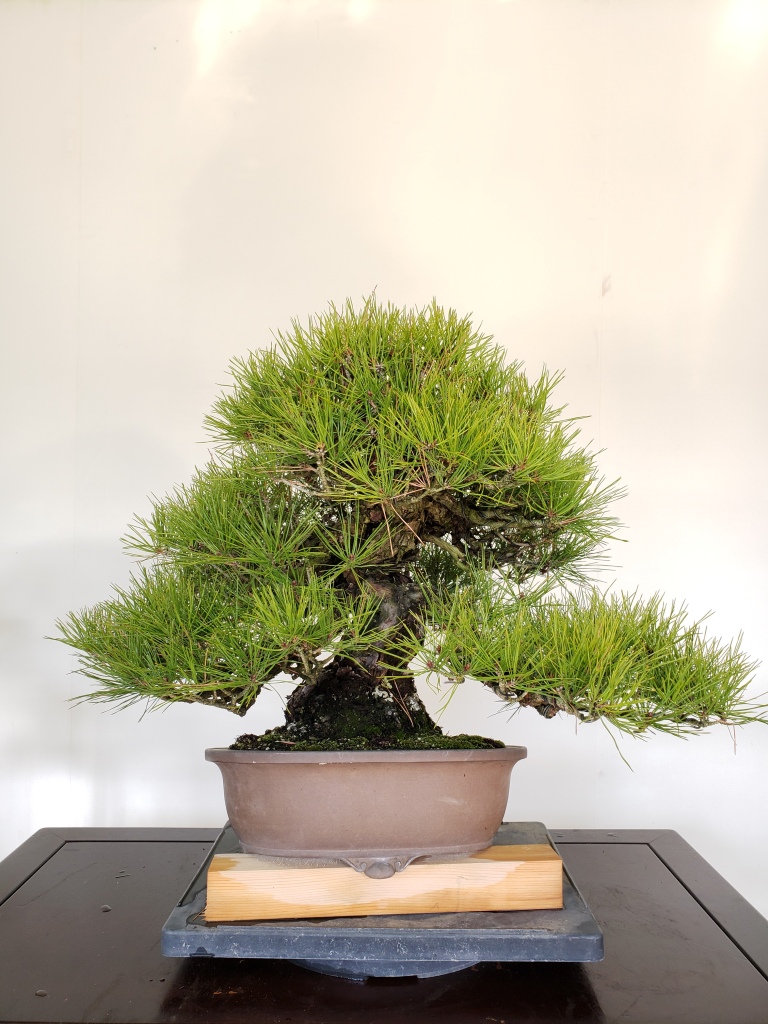
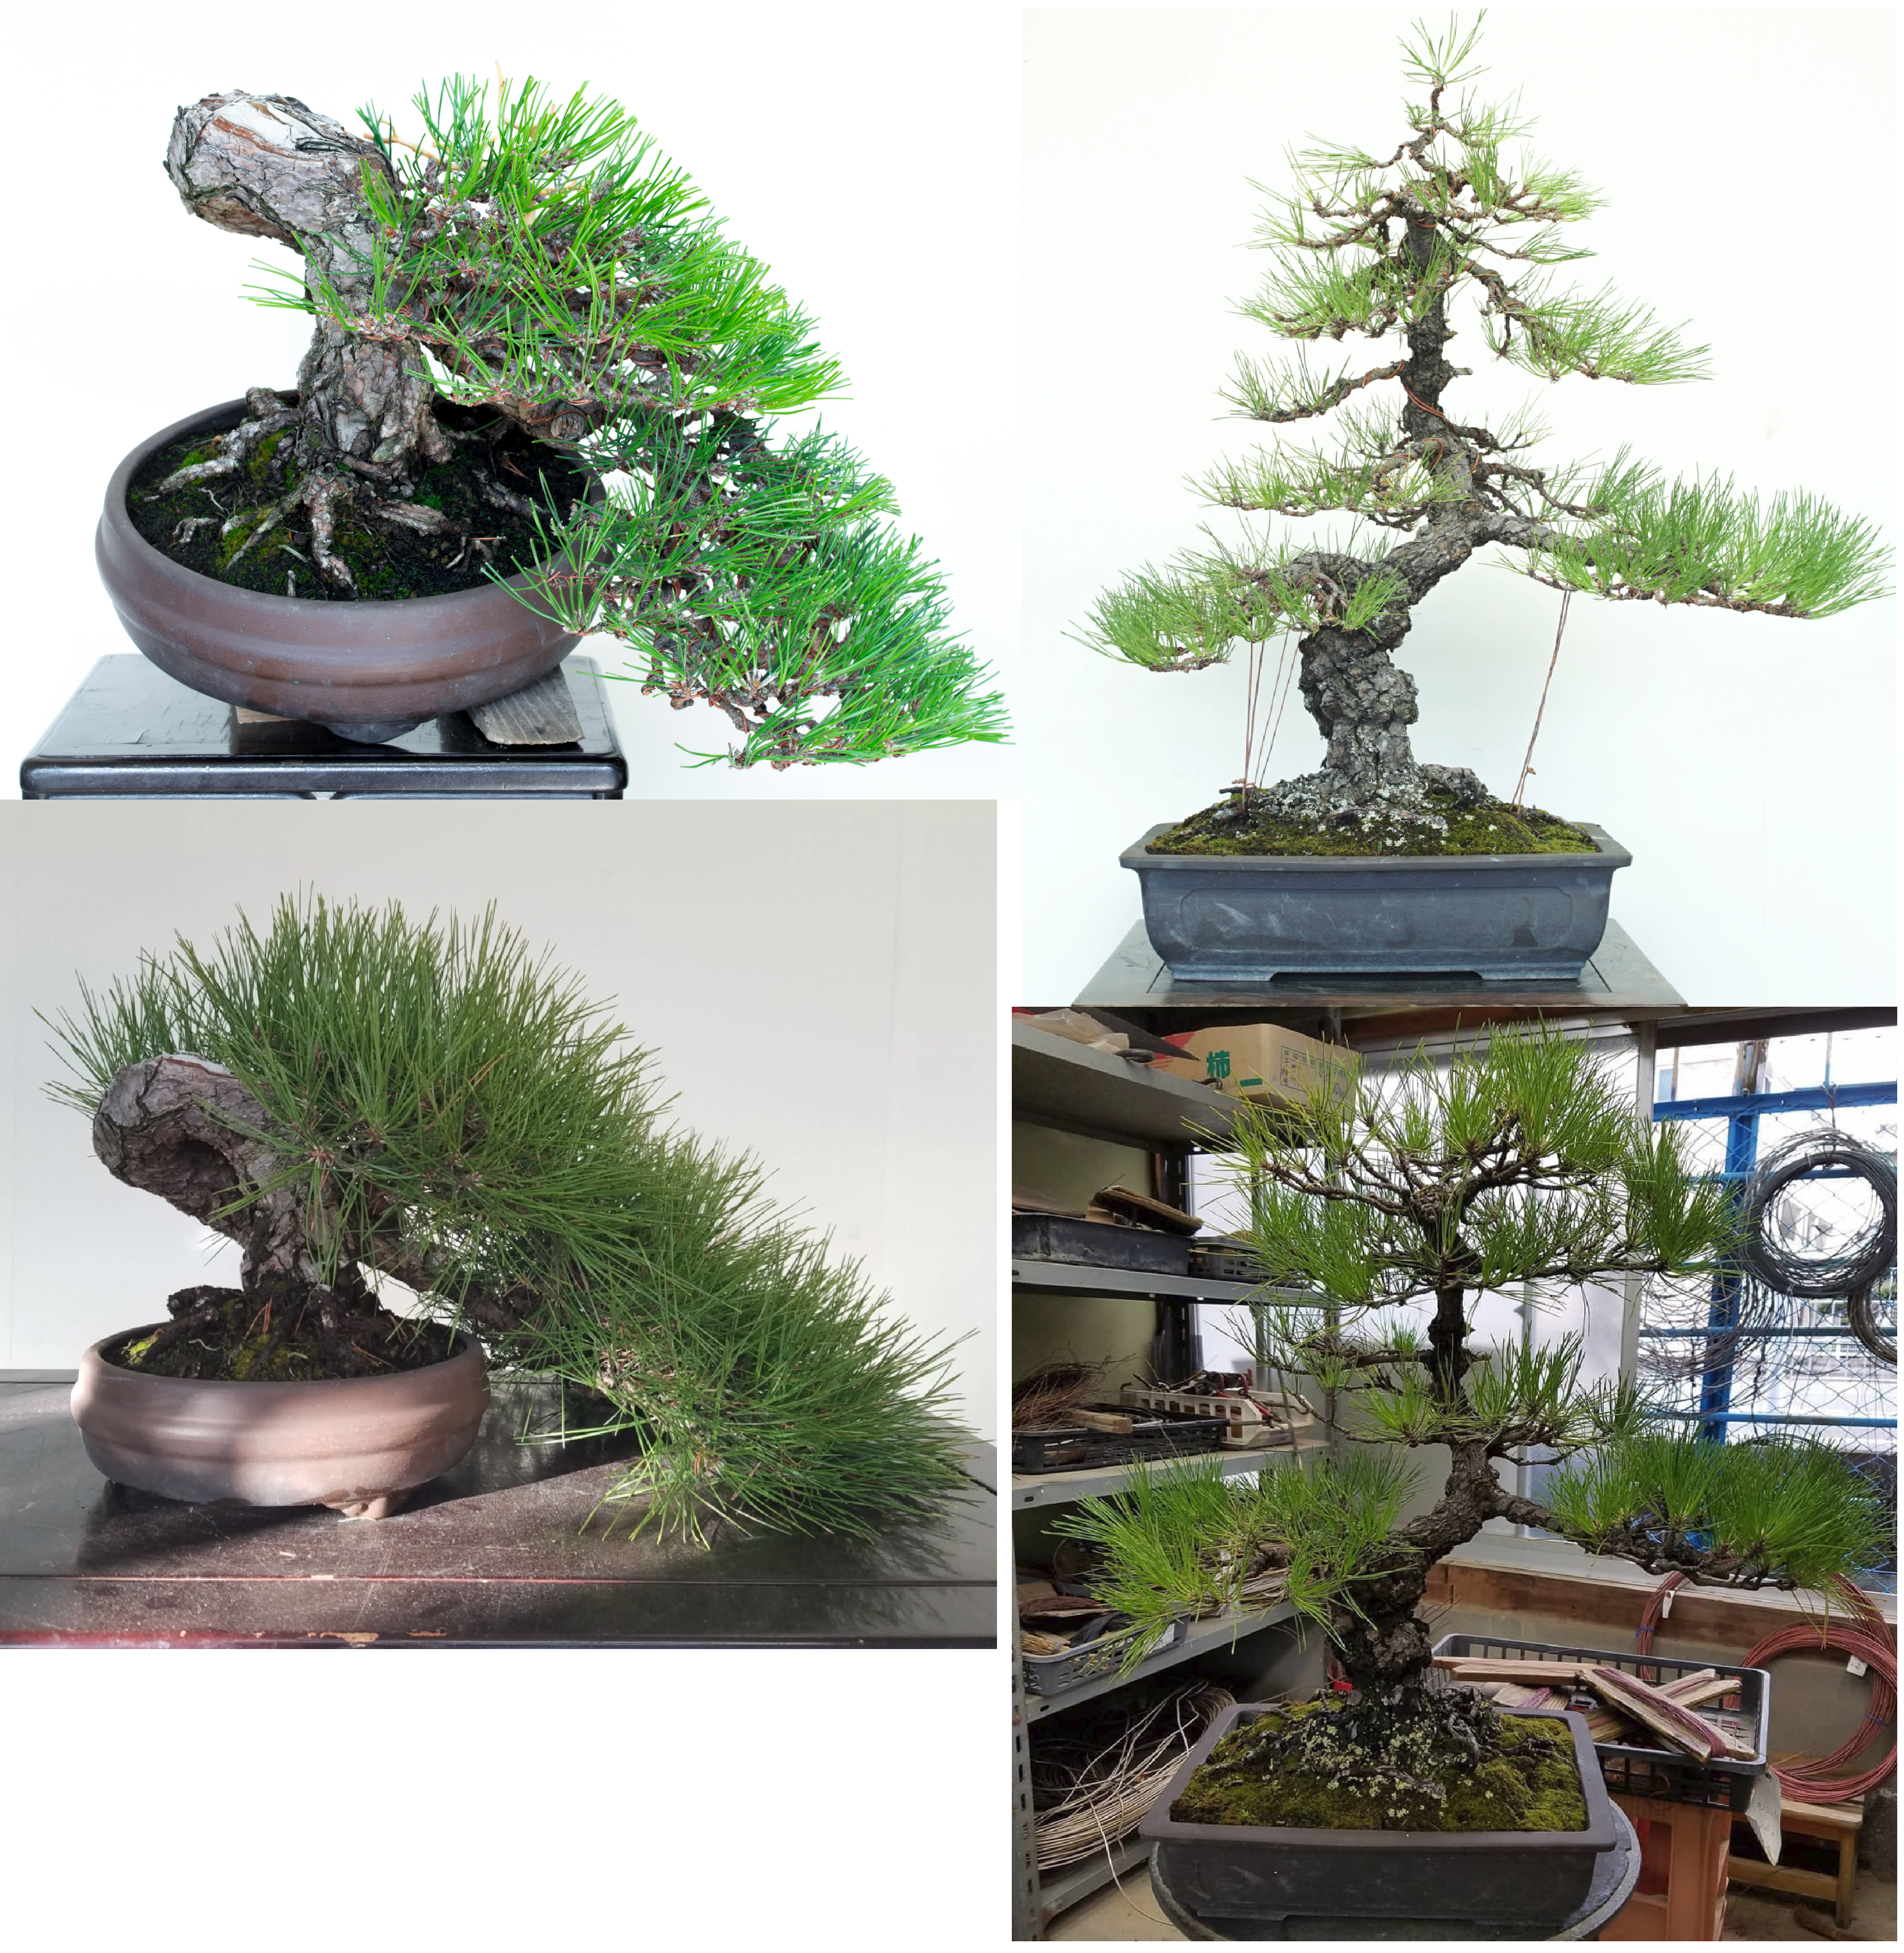
Recent black pine work


Contrasting my most recent work with my first few projects, I can definitely feel that I am learning and improving my technique (but still with plenty to learn):


Working as an apprentice in Japan has had many positive and exciting aspects to it. I’m spending most of my time doing something I’m passionate about and engaging. I’m surrounded by amazing trees and more importantly, I get to work on them too. Oyakata believes in a very hands on approach to commit things to memory and to hone the inherent “sense” people have when it comes to working on and styling trees.

But equally as prevalent there’s the mundane daily grind of sustaining a living here. Here at Kouka-en we live offsite meaning we’re provided our own apartments. As full time apprentices we’re paid, but just enough to cover living expenses. But we still need to manage expenses to be able to cover bills, food cost, as well as cooking and eating within reason. コンビニ (“konbini”) is the Japanese name for convenience stores. And boy they are mighty convenient–you pay your bills there, mail packages there, and get quality full meals. But by easily making one too many lunch trips a week it’s easy to go over budget. So to stay out of the red each month but to also allow me to save a bit, I cook the majority of my meals. Typically I don’t eat breakfast (often from waking up too late), lunch is a 50/50 split between packed meals and purchased bentos, and I usually cook dinner.
Here are my expenses for typical month. Gas bills are higher in the winter from using more hot water when I’m cold and lower in the summer when I don’t need hot showers.

After phone and internet I’m usually around the 35,000 to 40,000 yen mark, or a bit under $400 USD. We get 60,000 yen a month meaning that on average I can save about $200 a month. It’s fairly bare bones, but enough to sustain life as an apprentice. The trade off is the significant time sink that goes into cooking, which is of course, outside of apprentice hours.

Life as an apprentice is very much working inside a bubble. This is of course my own biased opinion and experience, it may differ at other nurseries or for other apprentices. We’re not really integrated or exposed to much of the greater Japanese culture, limited both by the interactions we have in the nursery and the breadth of the Japanese language we are exposed to and use. I have become painfully aware of this in my mixed attempts to carry out conversations with Japanese people I meet. Without a strong sense of community or family at the nursery I do feel quite isolated sometimes and a little lonely.
To remedy this as well as to improve my interactions with Japanese customers, I have been intent in practicing and self teaching myself Japanese. From my efforts prior to coming to Japan and this past year, I’m happy to say I can at least get by or make small talk with my barber or a bartender, but it’s never enough. By elevating the skill of my language ability, I hope to make Japanese friends who can help integrate me into their community. But admittedly with a full time schedule and 2 days off a month I have days where there’s an immense mental barrier for me to find the motivation and energy to practice and study.
I guess collectively, these are things that can wear people down long term which has made me realize the long term difficulties pursuing an apprenticeship as an foreigner in Japan. Between sacrificing some of my interpersonal relationships, and garnering skepticism from some friends and family I feel a nagging pressure in the back of my mind. That I have to succeed out here no matter the cost. But at the core of it I am doing this for myself and I’m strongly motivated to see things through.
All in all I can say its been a successful first year and I’m ready to tackle on another. I believe the difficulties and new experiences I undergo here will shape me into the best possible version I can be.
Many thanks to those of the community who follow and support me, it really does mean a lot. And also a big thanks to the Golden State Bonsai Federation (GSBF) that awarded me the Harry Hirao scholarship which was a big help the past year.
For readers subscribed to my blog, I apologize for the lack of updates as I have been primarily posting on Facebook and Instagram. I actually enjoy writing a good bit, it’s just a time consuming endeavor. I’ll try to crack out more articles for interesting work or projects I get in the future.
It’s over a month into spring and deciduous work has been well underway. Generally speaking, there are some common goals in the scissor techniques we apply during spring.
1) Balance: In short this means to strengthen weak areas while controlling strong regions of the tree
2) Sunlight: Although this can be considered apart of balance it’s important enough to be overstated
With these two principles in mind lets look at our sample case:

I know you’re saying get with it already, but to really understand what we’re doing we need to think about shishigashira’s growth characteristic and shoot anatomy.
Shishigashira are characterized by dense foliage, small internodes, and curled leaves. The important parts are the first 2. It’s common to see shishi with dense pom pom like foliage mass at the end of a branch. This is due to the incredibly small internodes and close proximity of the leaves. Inspecting the spring growth brings insight to the reasoning.
Case 1:

Case 2:

A typical spring maple shoot has 2 “susoba” or budless leaves, followed by a small extension, symmetrical pair of leaves, then lastly a strong central shoot that will keep extended if left unpinched. For Japanese maples we typically pinch or cut the central shoot, then after the leaves harden we cut one leaf off the pair and the remaining leaf in half (to allow light into inner canopy). Any susoba present are typically cut as well.
Shishigashira differs from most a. palmatum varieties in that they do not produce a strong central shoot. Interestingly under close inspection I realized that many of the shishigashira shoots do not even have susoba. Looking at case 1, this means at the first set of leaves do have basal buds and that tiny nub in the middle is the central shoot produced by the tree. If we were to treat it as we do standard japanese maple it means cutting that central shoot and one leaf off the pair. (the leaves don’t need to be cut in half as they don’t shade much light)

If we did this we would end up with a tiny tiny, almost non existent internode. Too small in fact. Because of this natural growth characteristic we actually need to work against it to encourage the tree to extend and produce longer internodes and ultimately branching! Otherwise we’re left with long branches with dense pom pom foliage tufts at the end. So to counteract this we cut off the leaves from the first pair entirely, followed by one leaf off the central pair.


Shishigashira can still produce long shoots on strong regions of the tree. In those areas we can cut back as we typically do with standard acer palmatum.

Although this shoot does not have susoba we can treat the pair of leaves as so. First pair cut, central shoot cut, and one leaf off second pair removed.
For some final thoughts, I would think that this technique could be applied to kotohime japanese maple which also produces naturally very small internodes.
On another note, I will also be in the states the first 2 weeks of June to see family. If you’re in California and you want to talk bonsai or hang out let me know! Thanks for the read.
Julian
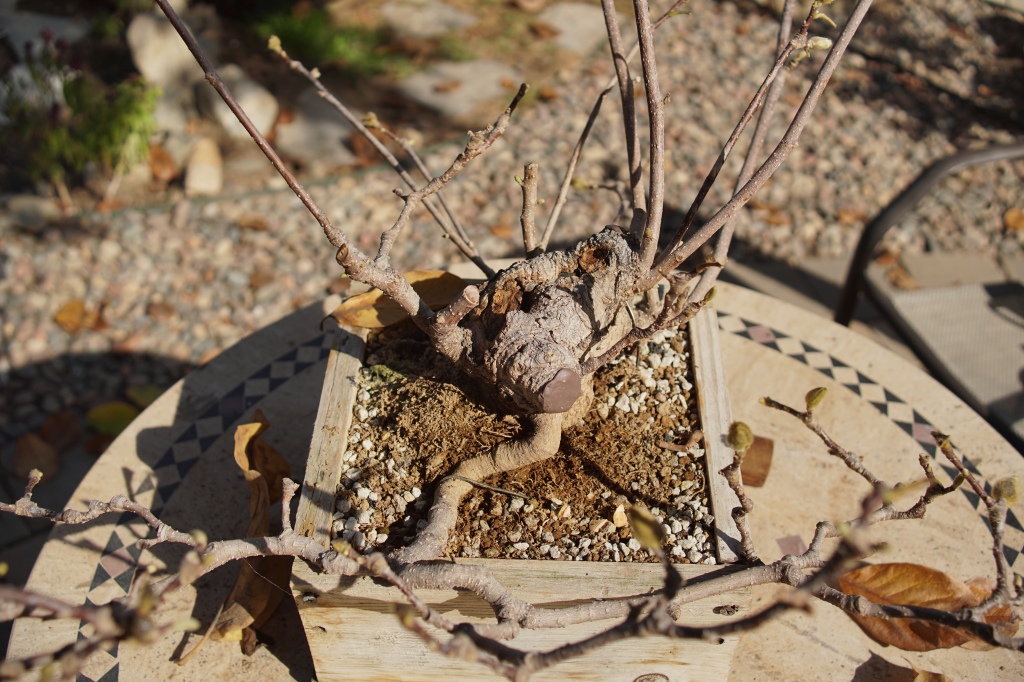
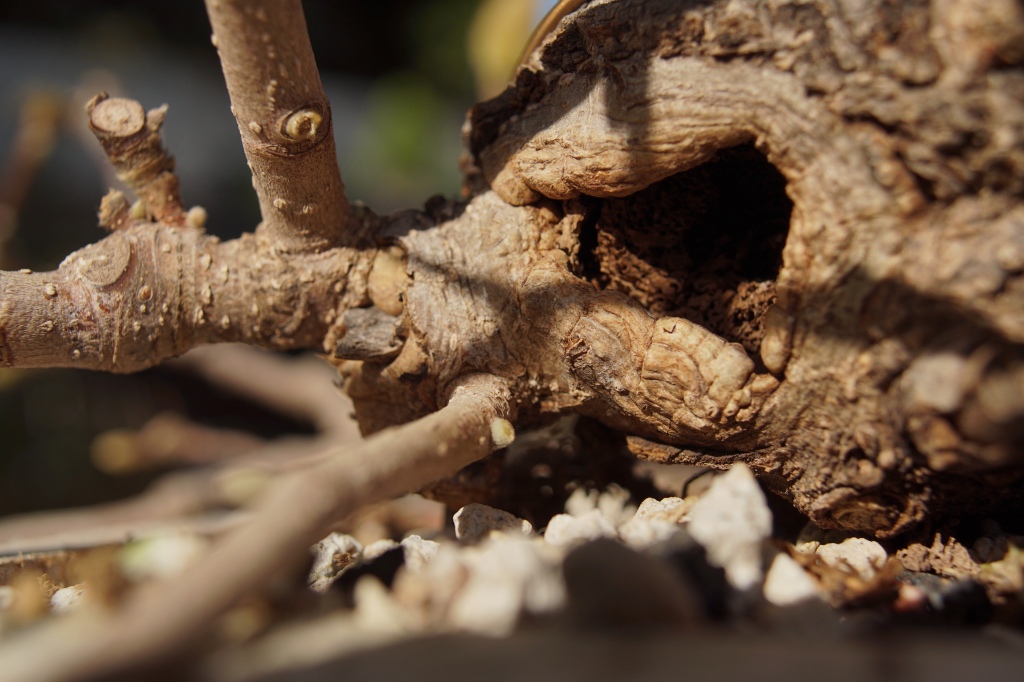
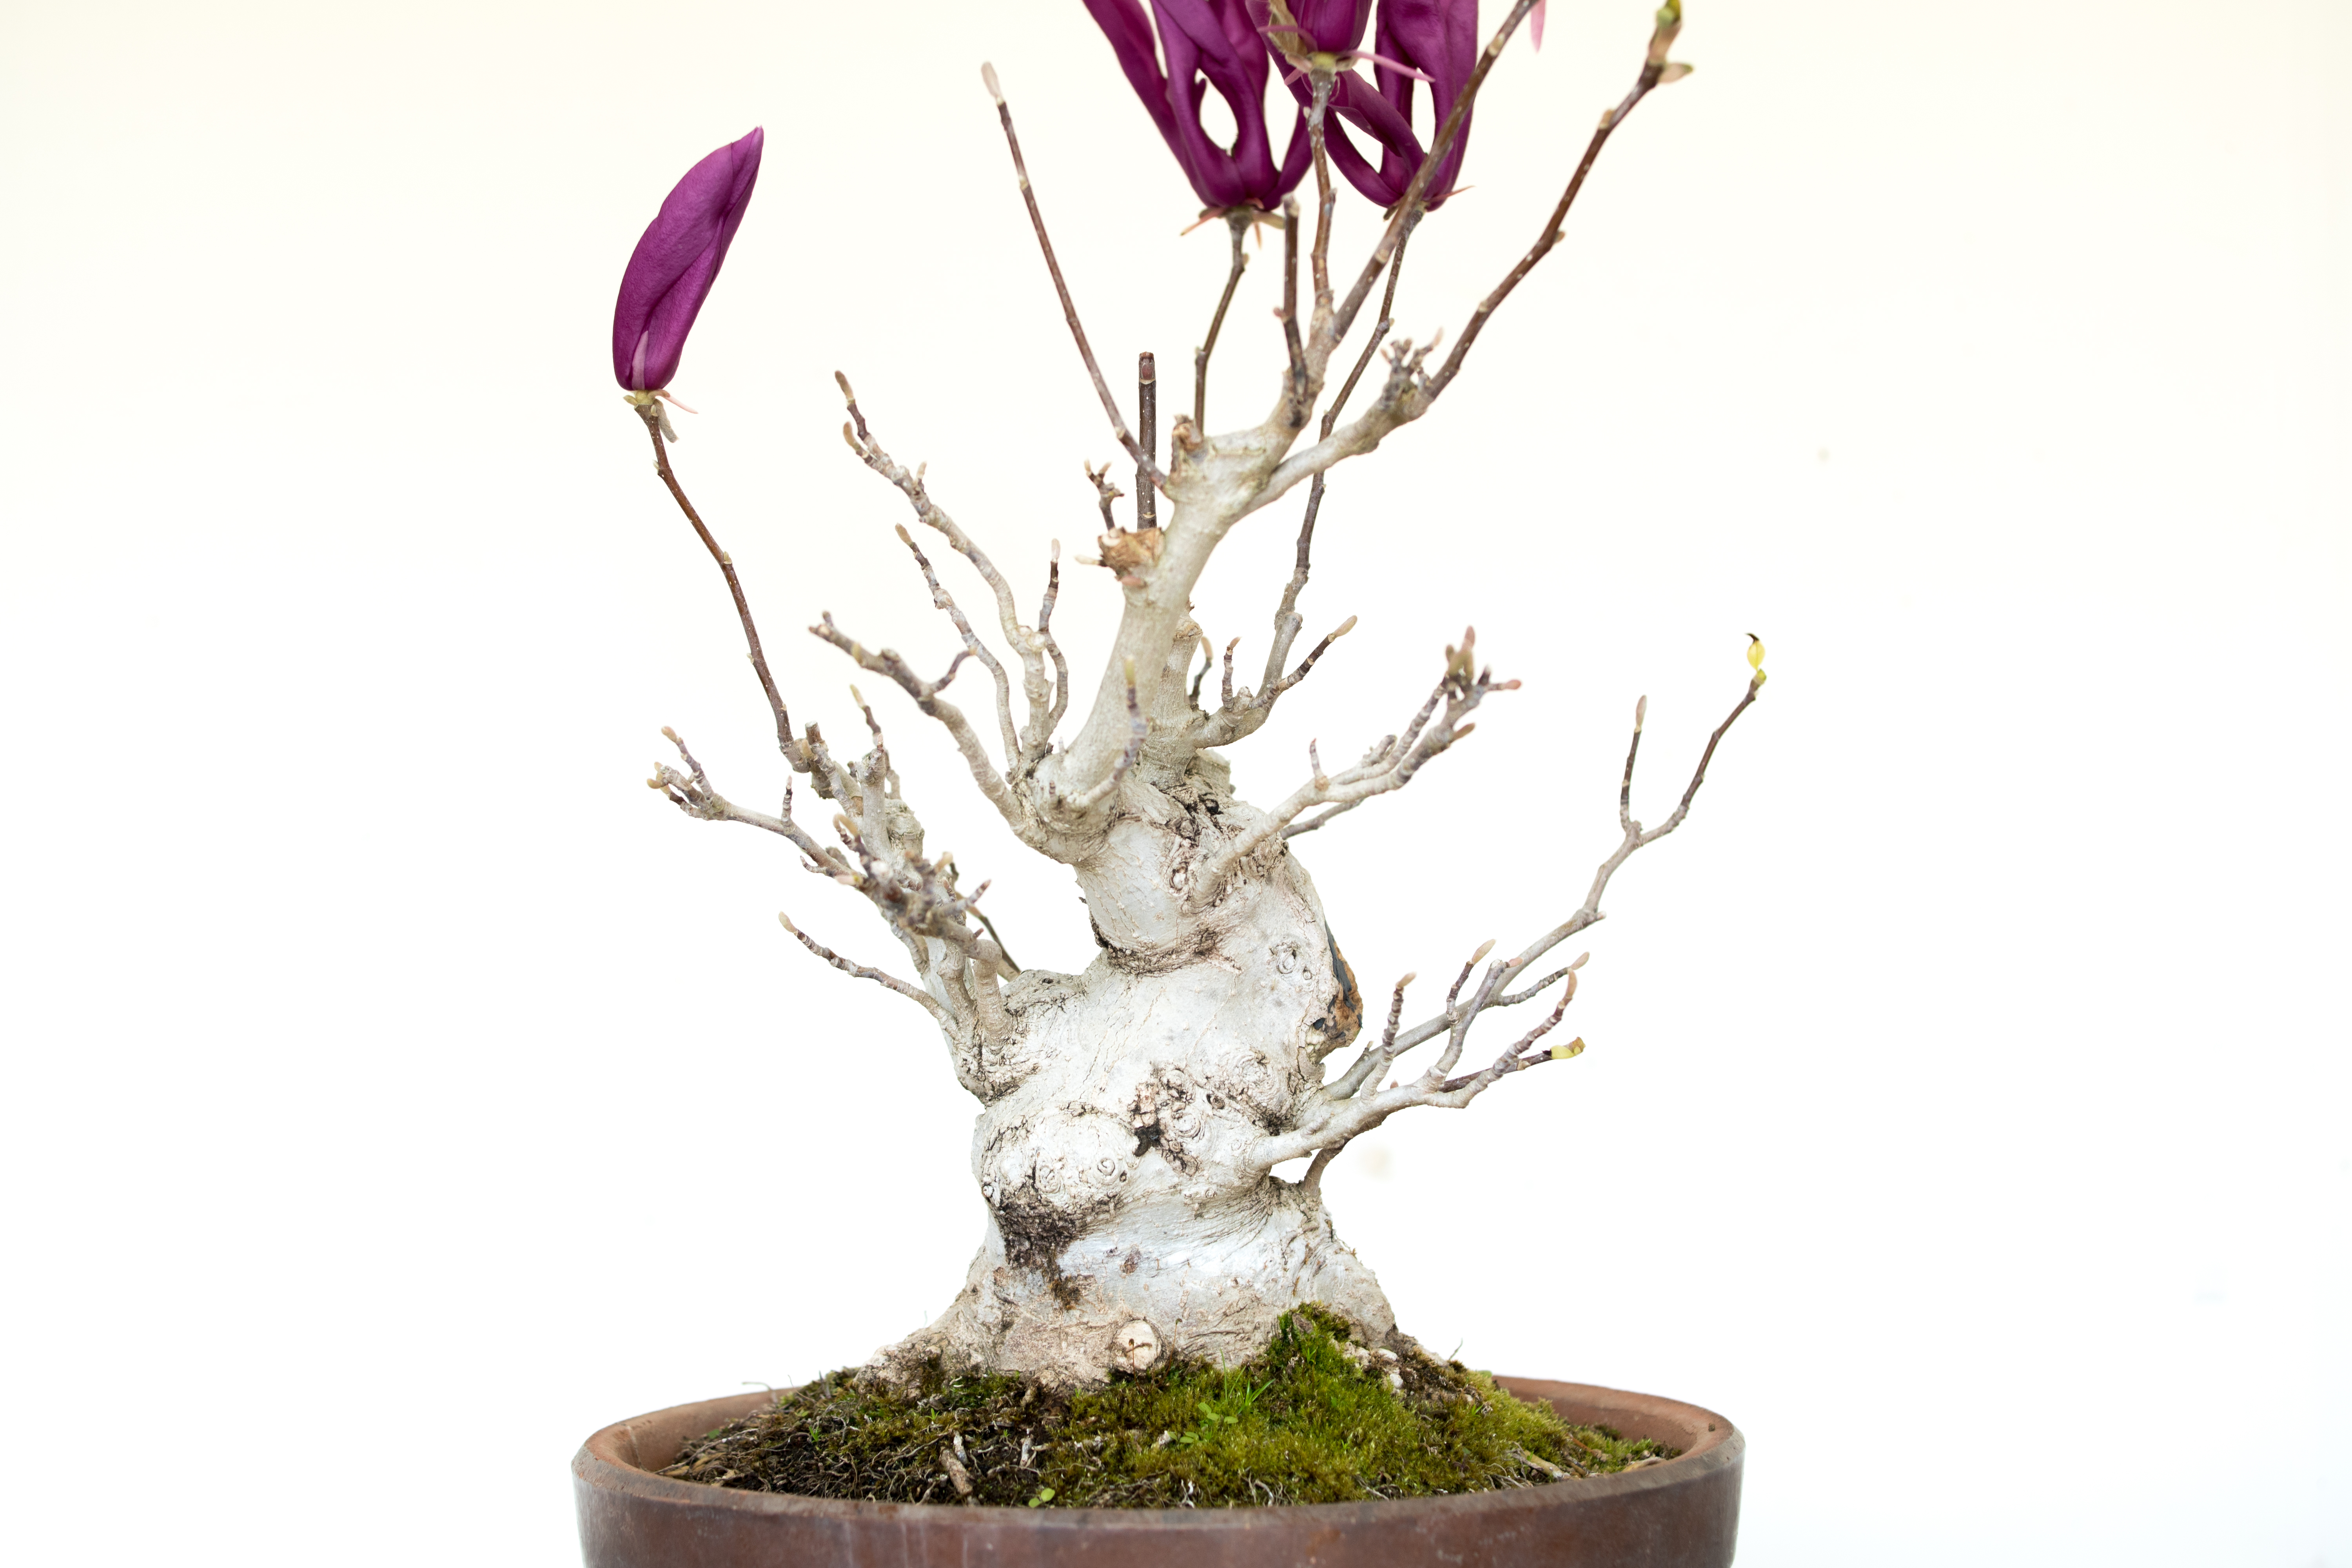
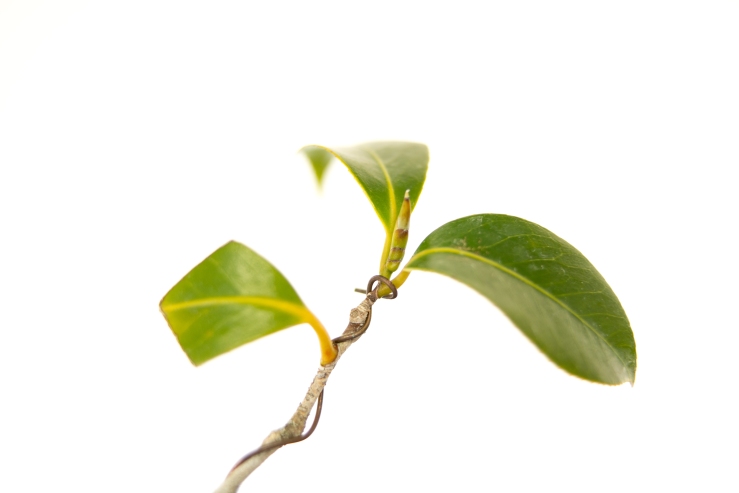
Magnolias are ubiquitous in gardens around the world. They mark the end of winter with a spectacular bloom, decorating landscapes in both vivid and subdued tones. My family home has a large magnolia that reliably graced us with beautiful blooms each year while providing a cool shaded understory during the hot summer months. They are among my favorite broadleaf deciduous species and I’m happy to be able to develop one during my apprenticeship here. Lets get to business. For starters the tree:

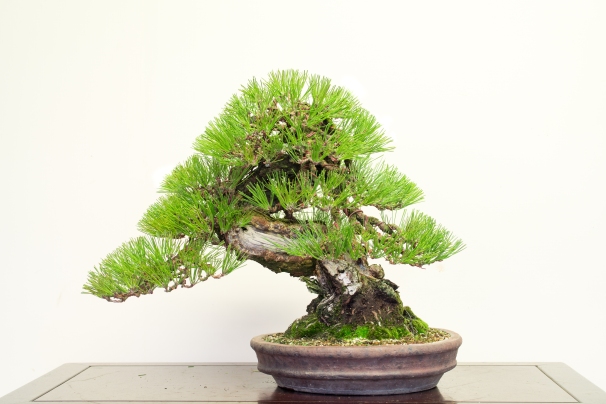
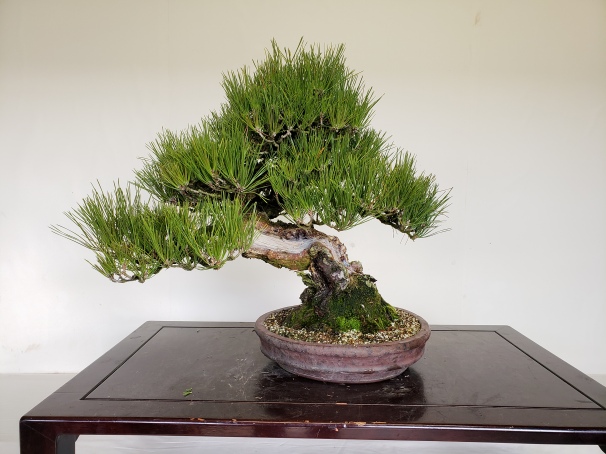
First to clarify, this is magnolia liliiflora known by モクレン “mokuren” here in Japan. The flowers are big, and so are the leaves. But it’s my preferred variety over smaller leafed varieties like star magnolia. Liliiflora has a smooth cream to white color bark that contrasts strongly with the large and often vibrant flowers. Despite having smaller leaves, the star magnolia has a more subdued bark and less striking flowers. Magnolias are appreciated for their winter silhouette, beautiful bark, and flowers and for those reasons I like liliiflora more. Here is a mokuren displayed during this years Kokufu. I am told by Oyakata that it’s possibly the best mokuren in Japan:

Back to the tree:


From these set of photos there are few things that are obvious. The presence of a large scar, and an overly thick branch/bulge. Since we appreciate magnolias for their bark we should aim to encourage healthy callous formation to obtain a seamless trunk. To preserve the taper and form of the tree, we need to remove thick branches/bulges but this also introduces new potentially large scars. In order to ensure good callous formation and with some advice from my senpai I decided to only make one major cut. The other branches would remain as “sacrifices” whose collective foliage mass would help heal the wounds. If I did all major cuts at once the existing amount of branches and produced foliage may not be sufficient to heal the wounds. To do so I would have to allow some of the existing fine branching run and grow thick which would introduce more imbalances to be corrected in the future.
With this in mind I decided my “major” cut should be the bulge at the back of the tree:

This would be cut, introducing a big scar. But the large branches above it as well as branches immediate to the wound would aid in callous formation. While the 2 thicker branches to the right ultimately will be removed, the wound created by cutting those branches would be smaller and easier to heal, so for the time being the bulge is prioritized.
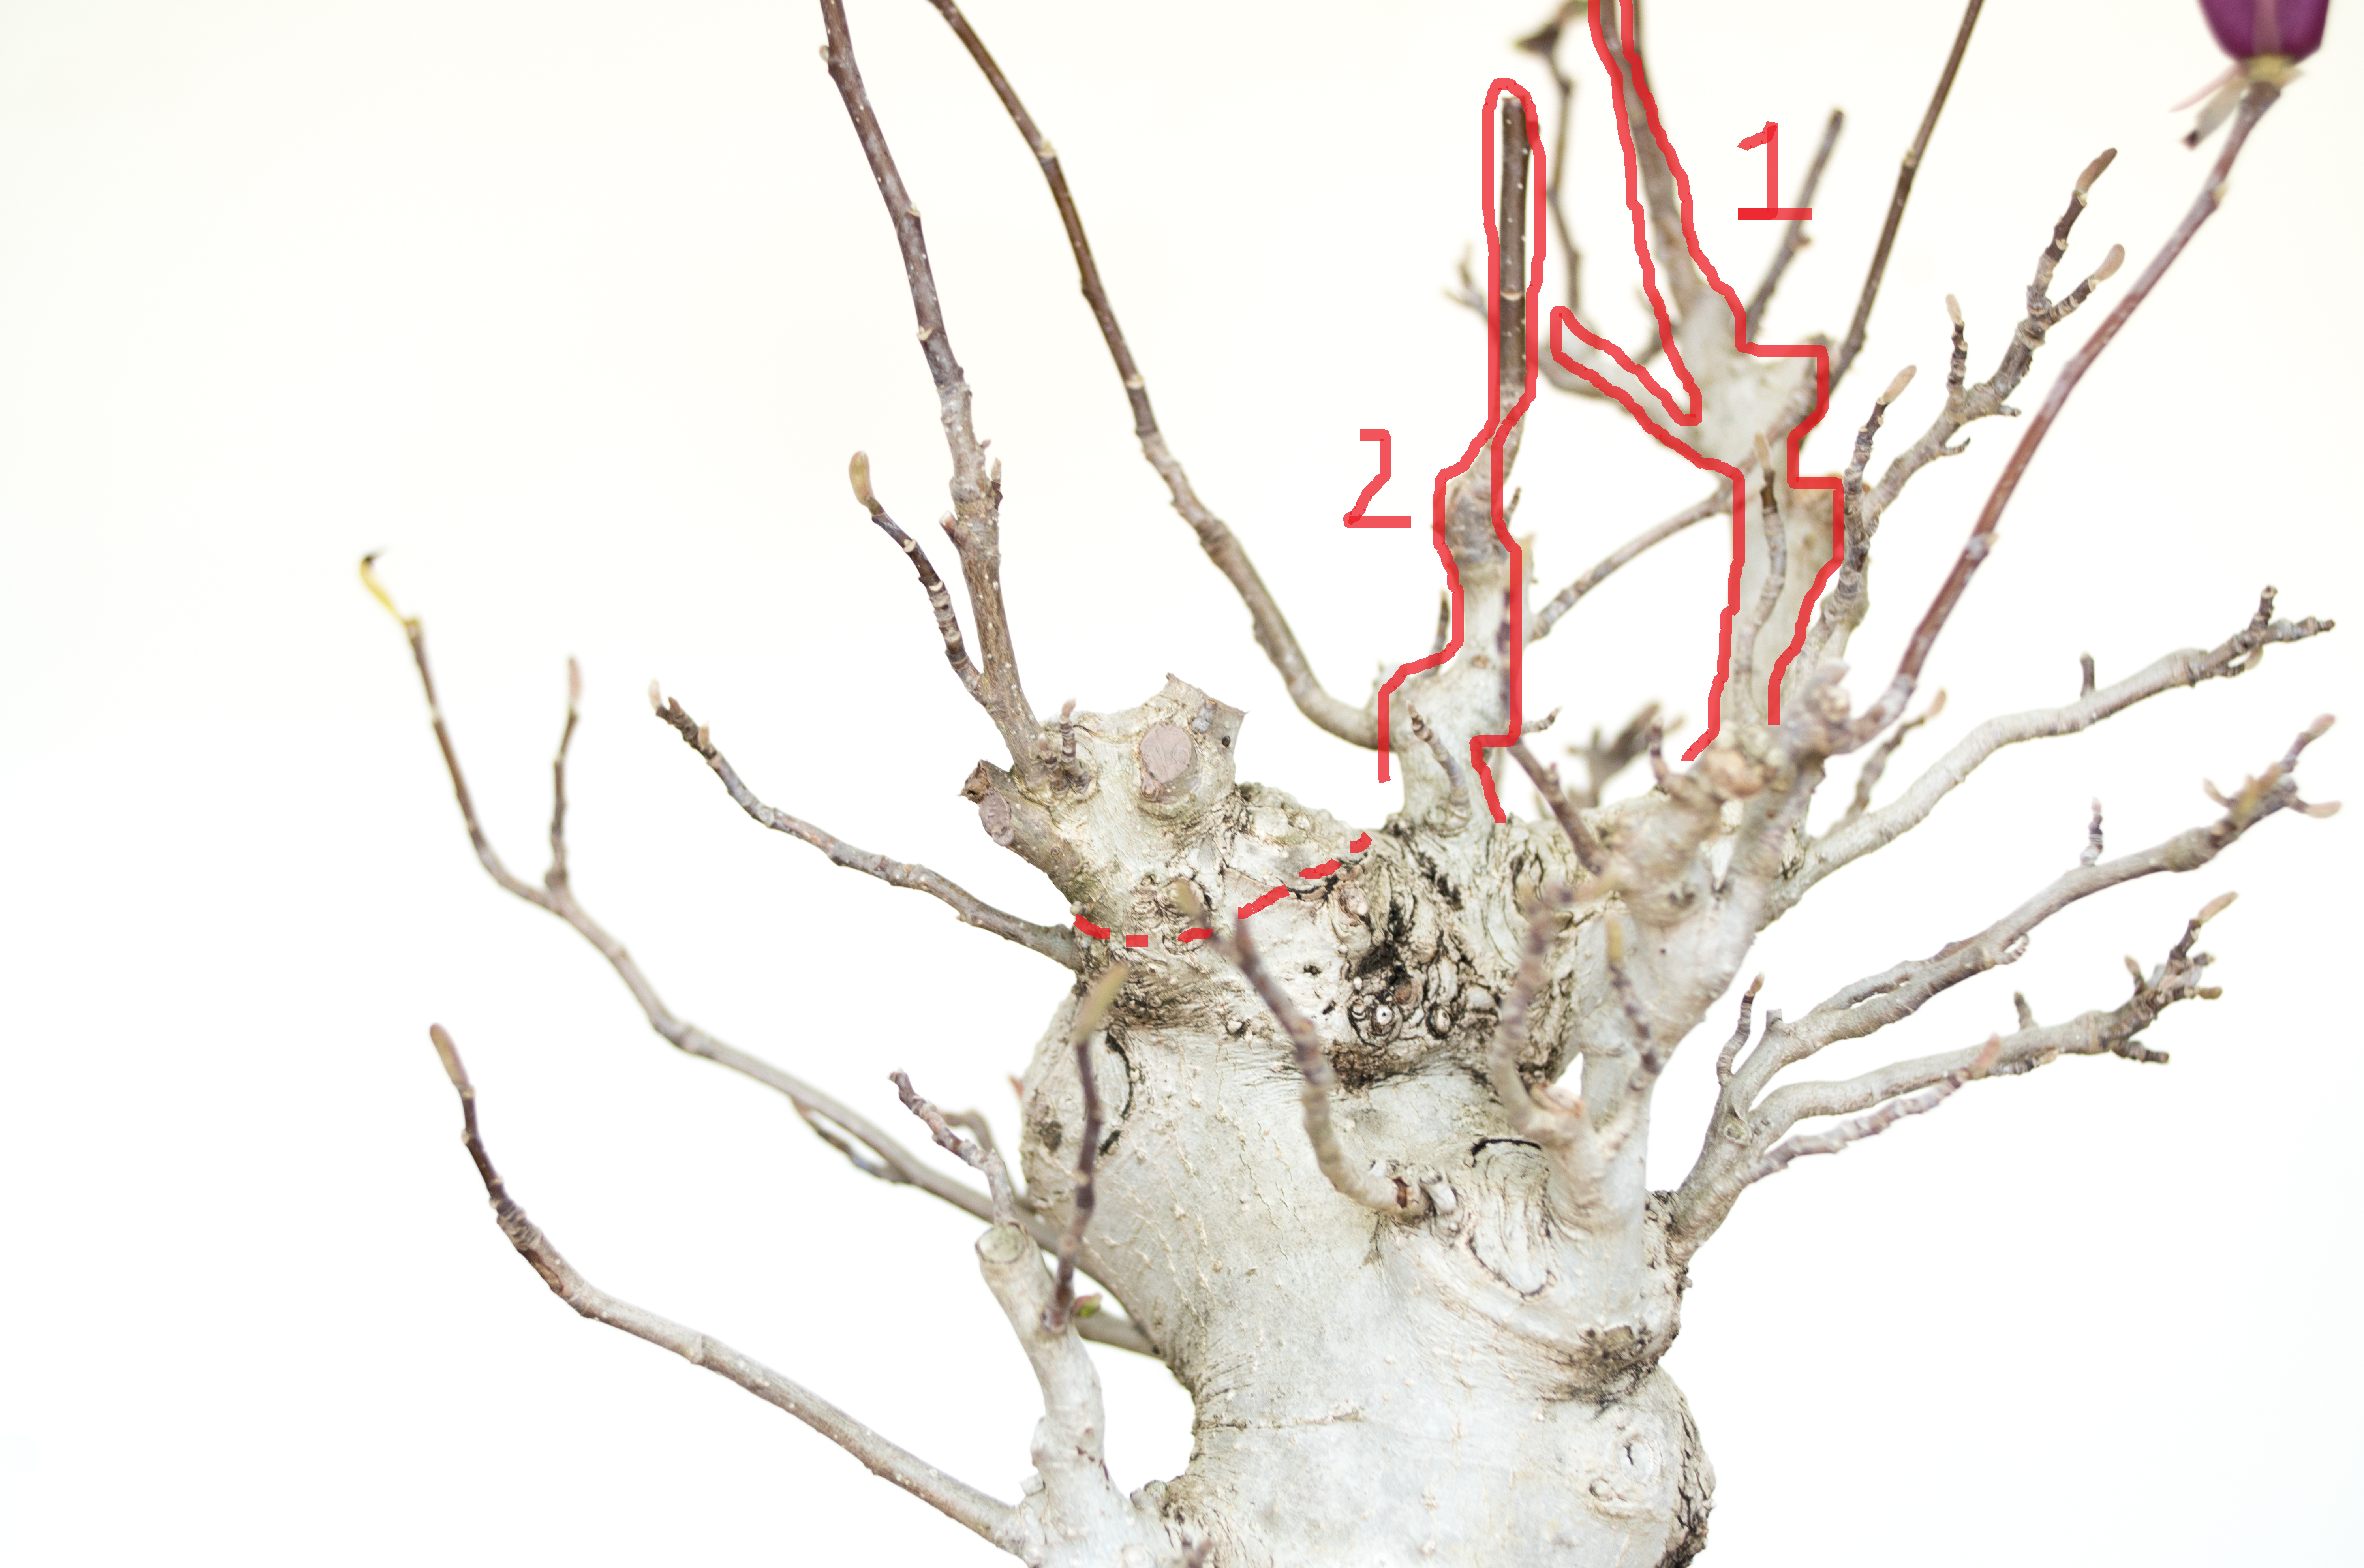
There are some concerns with this plan. Since one of my sacrifice branches (branch number 1) is attached directly to my apex, allowing this branch to get too thick can damage the taper of the tree as well as create another future large wound site when I remove it. Because of this I want to distribute the sacrifice branch burden across multiple branches. As soon as branch 1 starts to get too thick it will be cut. Branch 2 will take over as the main sacrifice and will be allowed to run as much as possible without overly compromising the tree’s design. Conveniently there is a small back branch immediate to the wound which I expect to provide lots of callous formation. There are more branches and buds at this base to replace the back shoot when it becomes too thick as a sacrifice as well. This multi-staged plan will help me avoid creating new large wounds while preserving the taper of the tree.
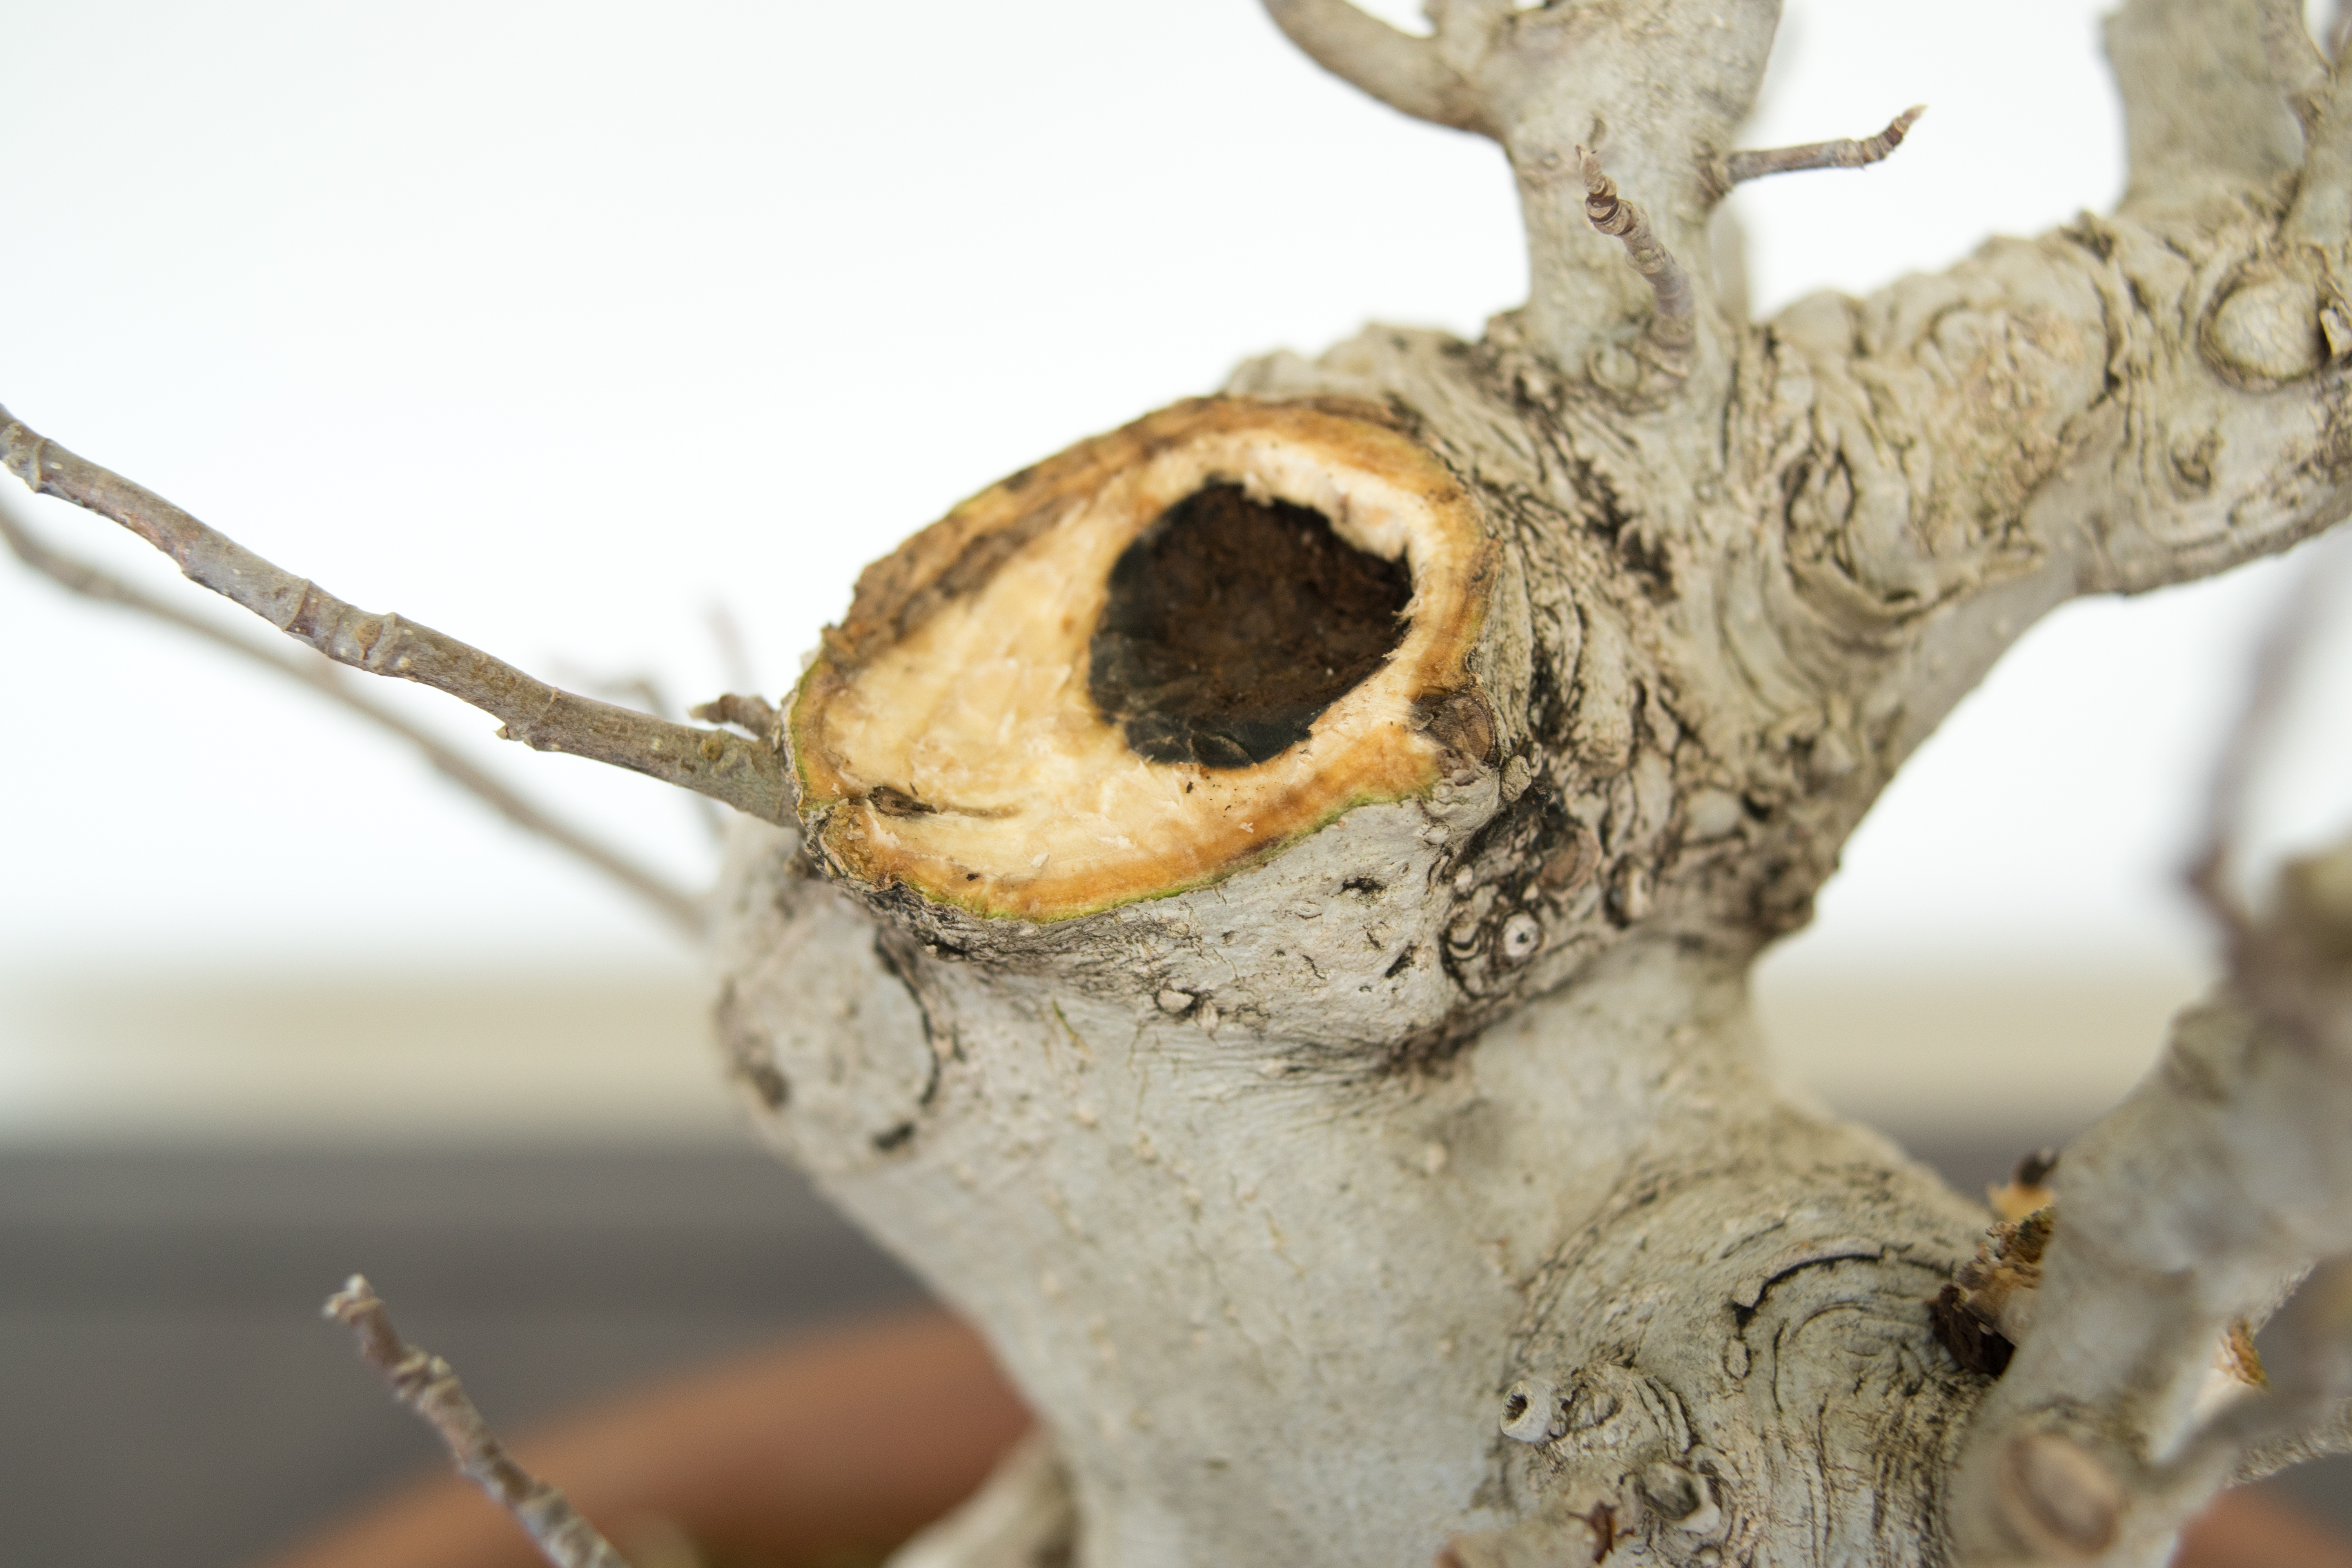
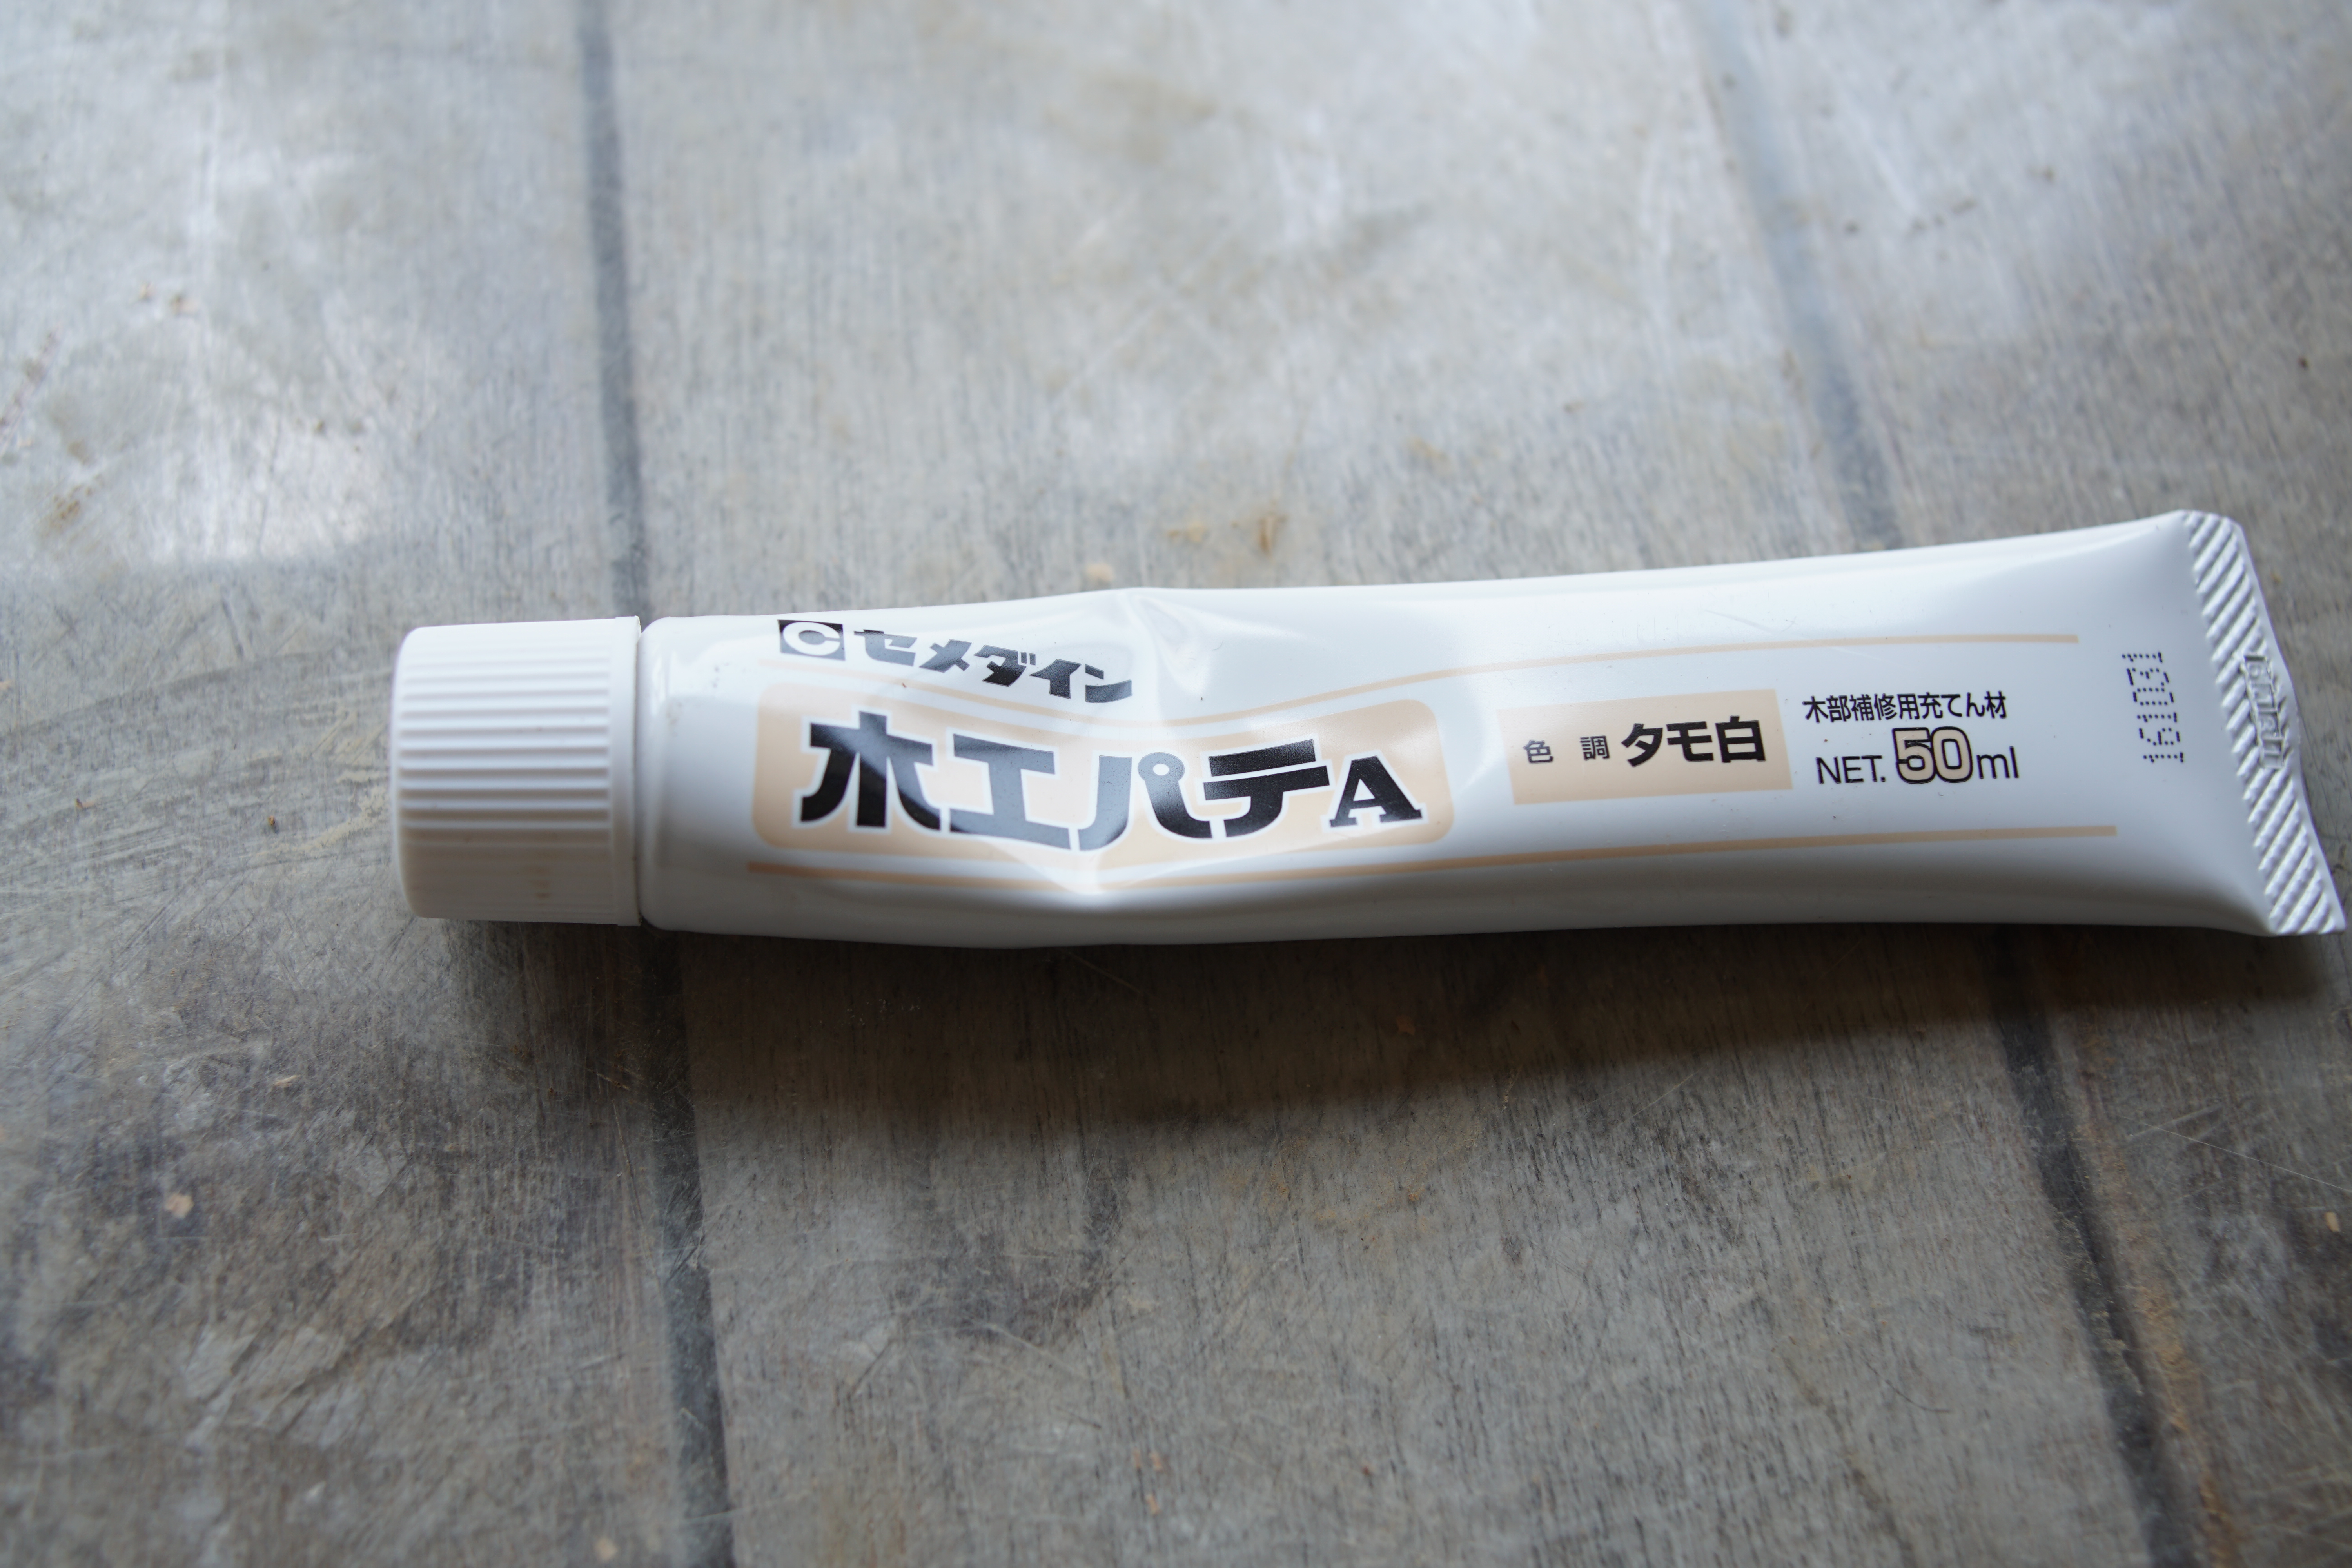
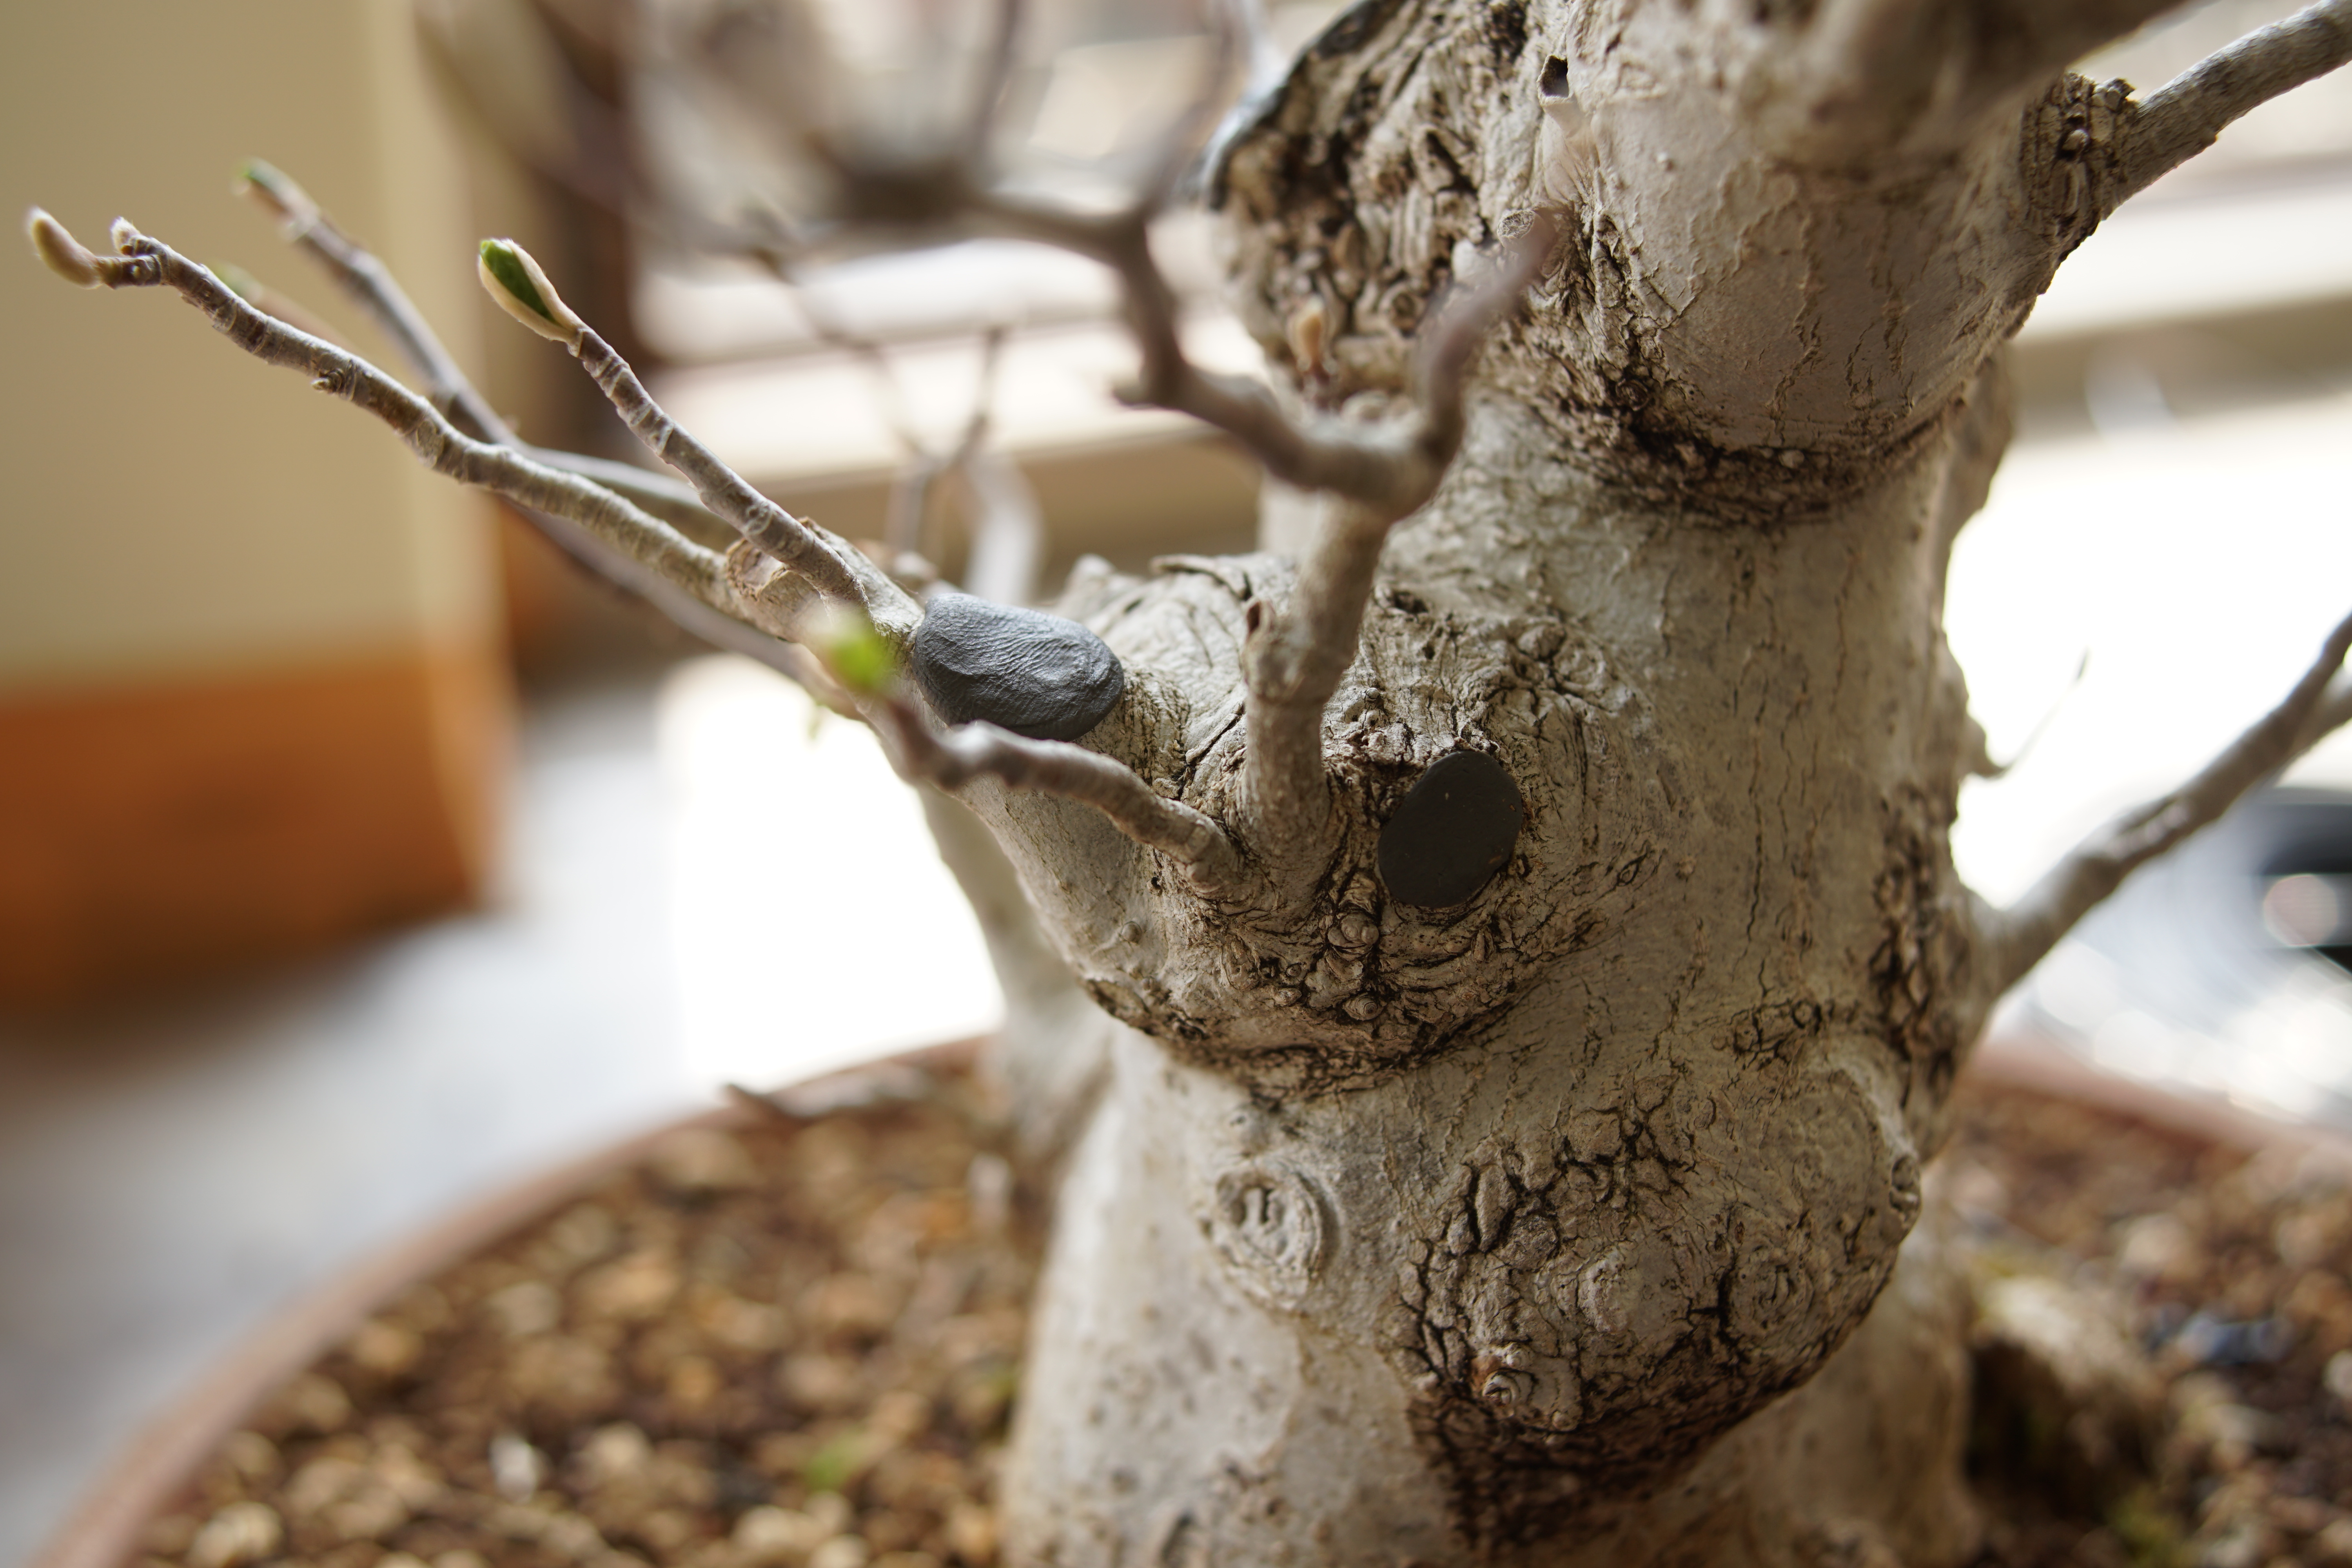
A slight depression is carved into the wound so that when it heals over it is flat without a substantial bulge. If the cambium is ragged after carving, use a grafting knife to cut cleanly across the entire edge. Unfortunately the heartwood on this tree was slightly soft. I wouldn’t say rotted or punky but after debating for awhile I gave in and decided to carve out the dark wood as well. I filled it with a faux wood filler, stuff you can find at home depot for damaged furniture, voids in wood, etc. My brief experience with it is that it takes a long time to dry and harden, especially if there is any moisture content in the wood. I would not recommend it for filling large wounds, in which case cement or a hard epoxy might be more suitable. I will report back later in the growing season if it holds up.

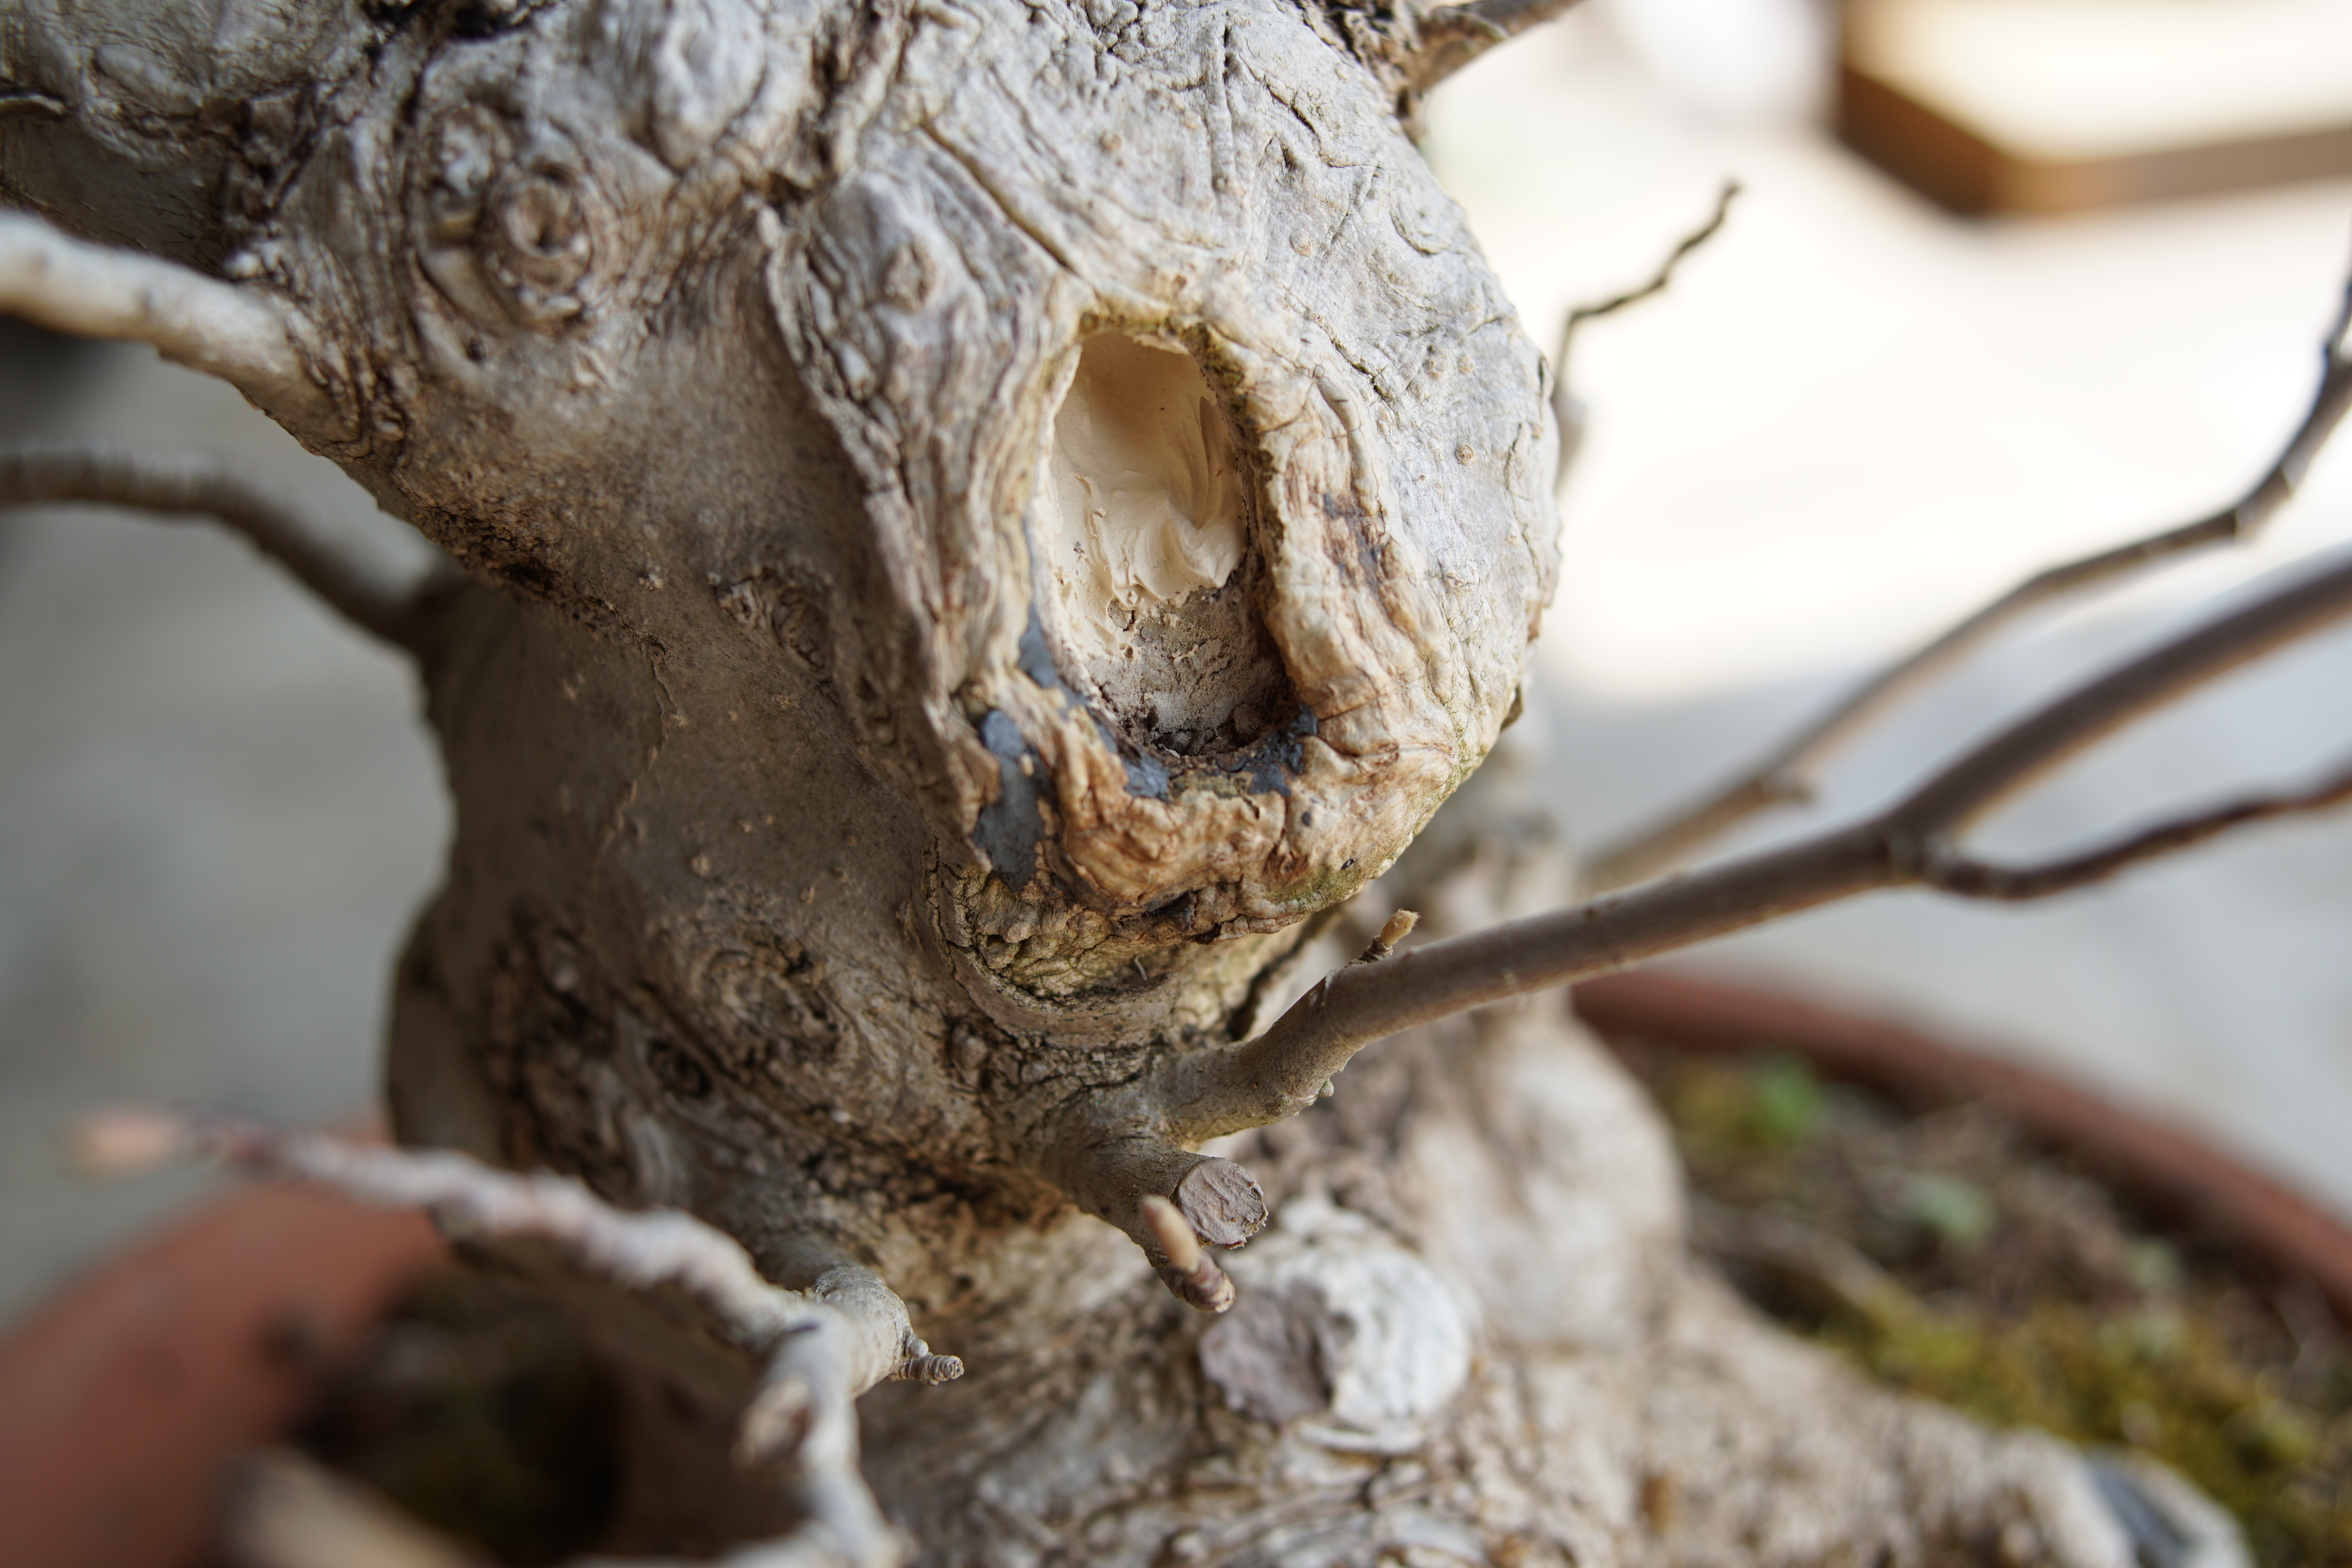
It’s time to inspect the other wound and if the callous needs to be recut. Unfortunately I discovered that the wood at this site was not just dark but actually rotted. I carved out all the soft wood and also painted lime sulfur on the deadwood to discourage future rot or fungal formation. Lime sulfur is bad and damaging to cambium so if you have any open cuts care not to spread it there.


The tree was actually repotted prior to doing all this work, but since the repotting season turned out to be quite busy I wasn’t afforded time to bring out my camera and take nice shots. As such I’ve depicted a basic overview of how we repot some deciduous trees here and how I did this tree in particular. During my days as a hobbyist I used a fork I bent in half and take out chopsticks as my sole repotting tools. I would do things a bit differently now. After my first repotting season I’m beginning to understand how nuanced repotting can be and how important it is to properly repot trees so not only an aesthetic, but horticulturally functioning and healthy root can be formed. I hope to make some proper posts on this in the future, but for now here is a basic overview.
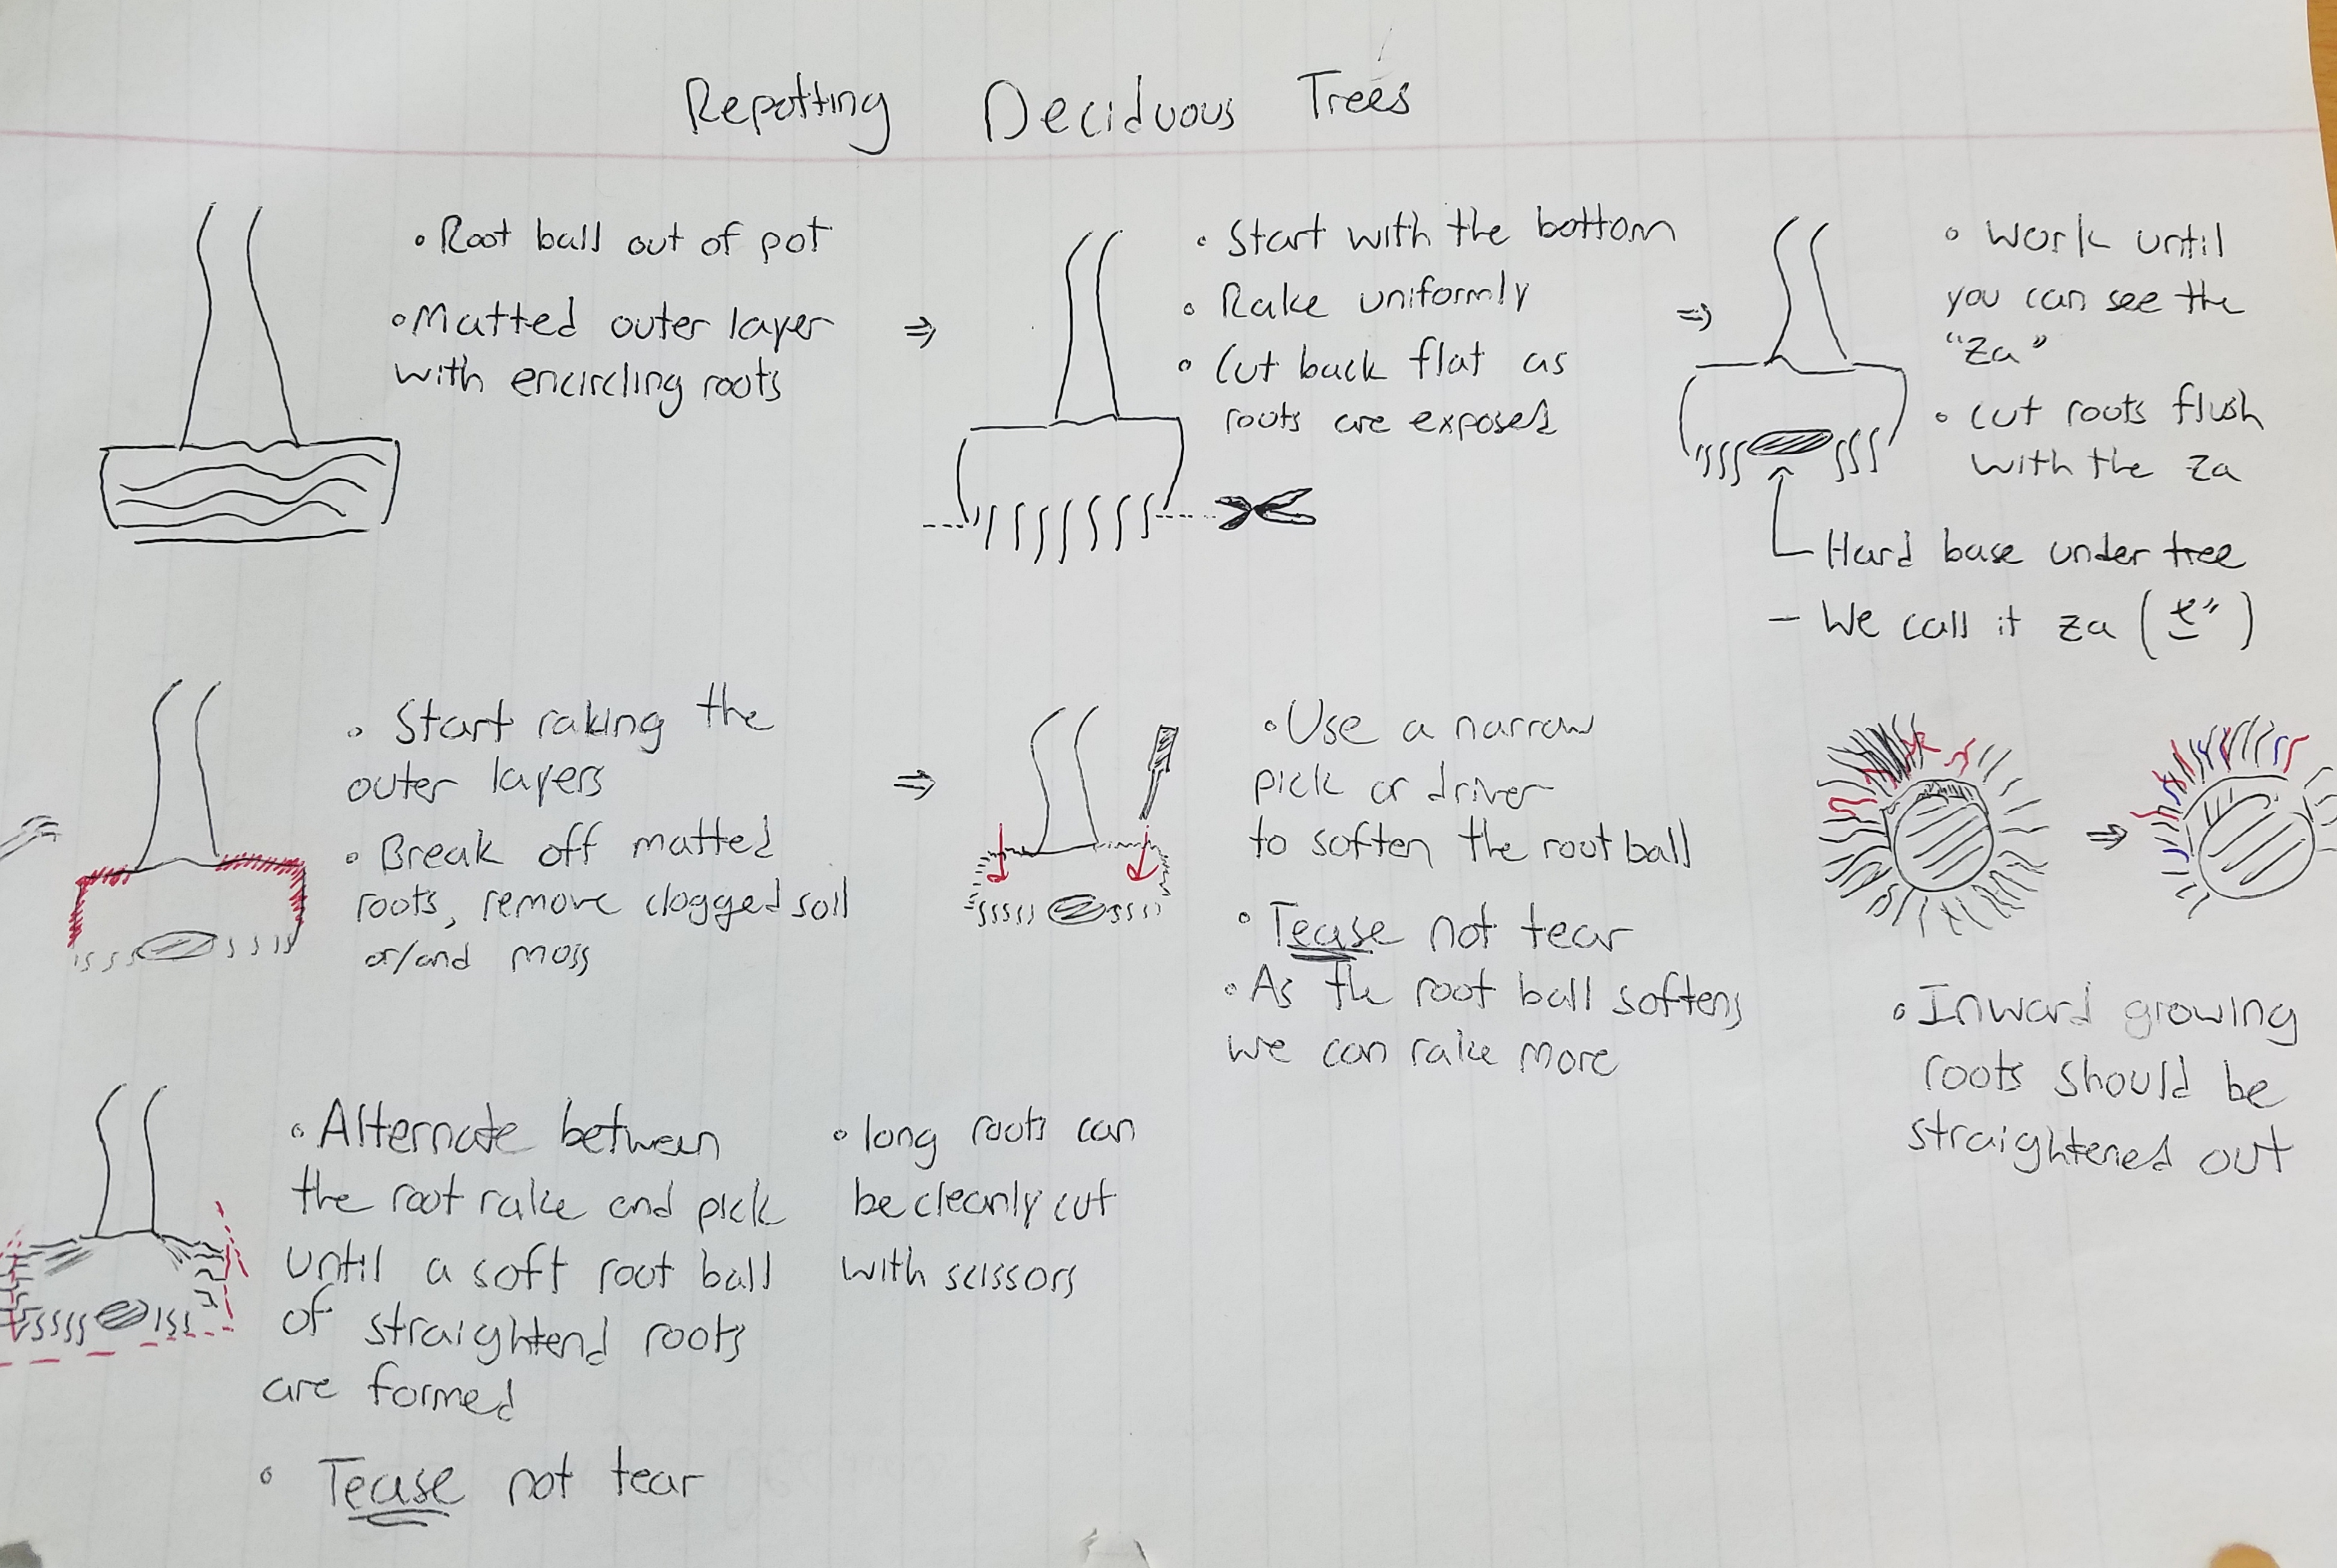

With the root system and scars set for the growing season ahead it was time to see if we could improve the silhouette or address structure problems.
I want to create as many fine branches as possible while minimizing clutter and the formation of bulges. On the left side of the tree there is an obvious density of branches originating from the same spot. The small lowest right branch is crossing and kind of interfering with the branches above it as well.

To begin with I removed one thick branch from this node. While the fine twigging on it added to the silhouette it was creating clutter between the other twigging and ultimately will grow to become a problem area with so many branches originating from the same spot.

Feels much better and less cluttered. My second concern was the most forward branch from that same junction. I felt that there were still too many branches from the same node and that while removing this branch would impact the trees current silhouette, branching and ramification from the branch behind it could easily fill the space.
To compensate I put on some aluminum wire and brought the branch behind it forward. The small twig at the base will develop and fill in the space behind it.


For now the work is done. The sacrifices will be allowed to run and I’ll check on callous formation over the growing season. Growth will be controlled on the smaller branches and possibly cut back to preserve the fine branching needed for the final design. Magnolias will never have super fine ramification and branching so this tree will be styled in a looser “flame” like form similar to a lot of ginkgos and stewartias. I’m excited to develop this tree and will post progress updates in the future.
It’s been long break since my last post. While I’m active on Facebook and Instagram I’m finding it exceedingly harder to write between the time I invest studying bonsai as well as learning Japanese. In any case I’m still alive, and for those who are still around thanks for reading!
I’ve recently gained a strong affection for camellias. Prior to coming to Japan I’d never seen a camellia used as bonsai before. Their floral display is spectacular and provide some contrast in the garden between the more commonly seen coniferous and deciduous varieties.
During the Kokufu-ten, where I assisted my Oyakata for over 2 weeks (brrr),


I picked up a small tsubaki (camellia) tree. It wasn’t anything super expensive, but the flower variety was nice, leaves were small, and was a young plant with good potential.

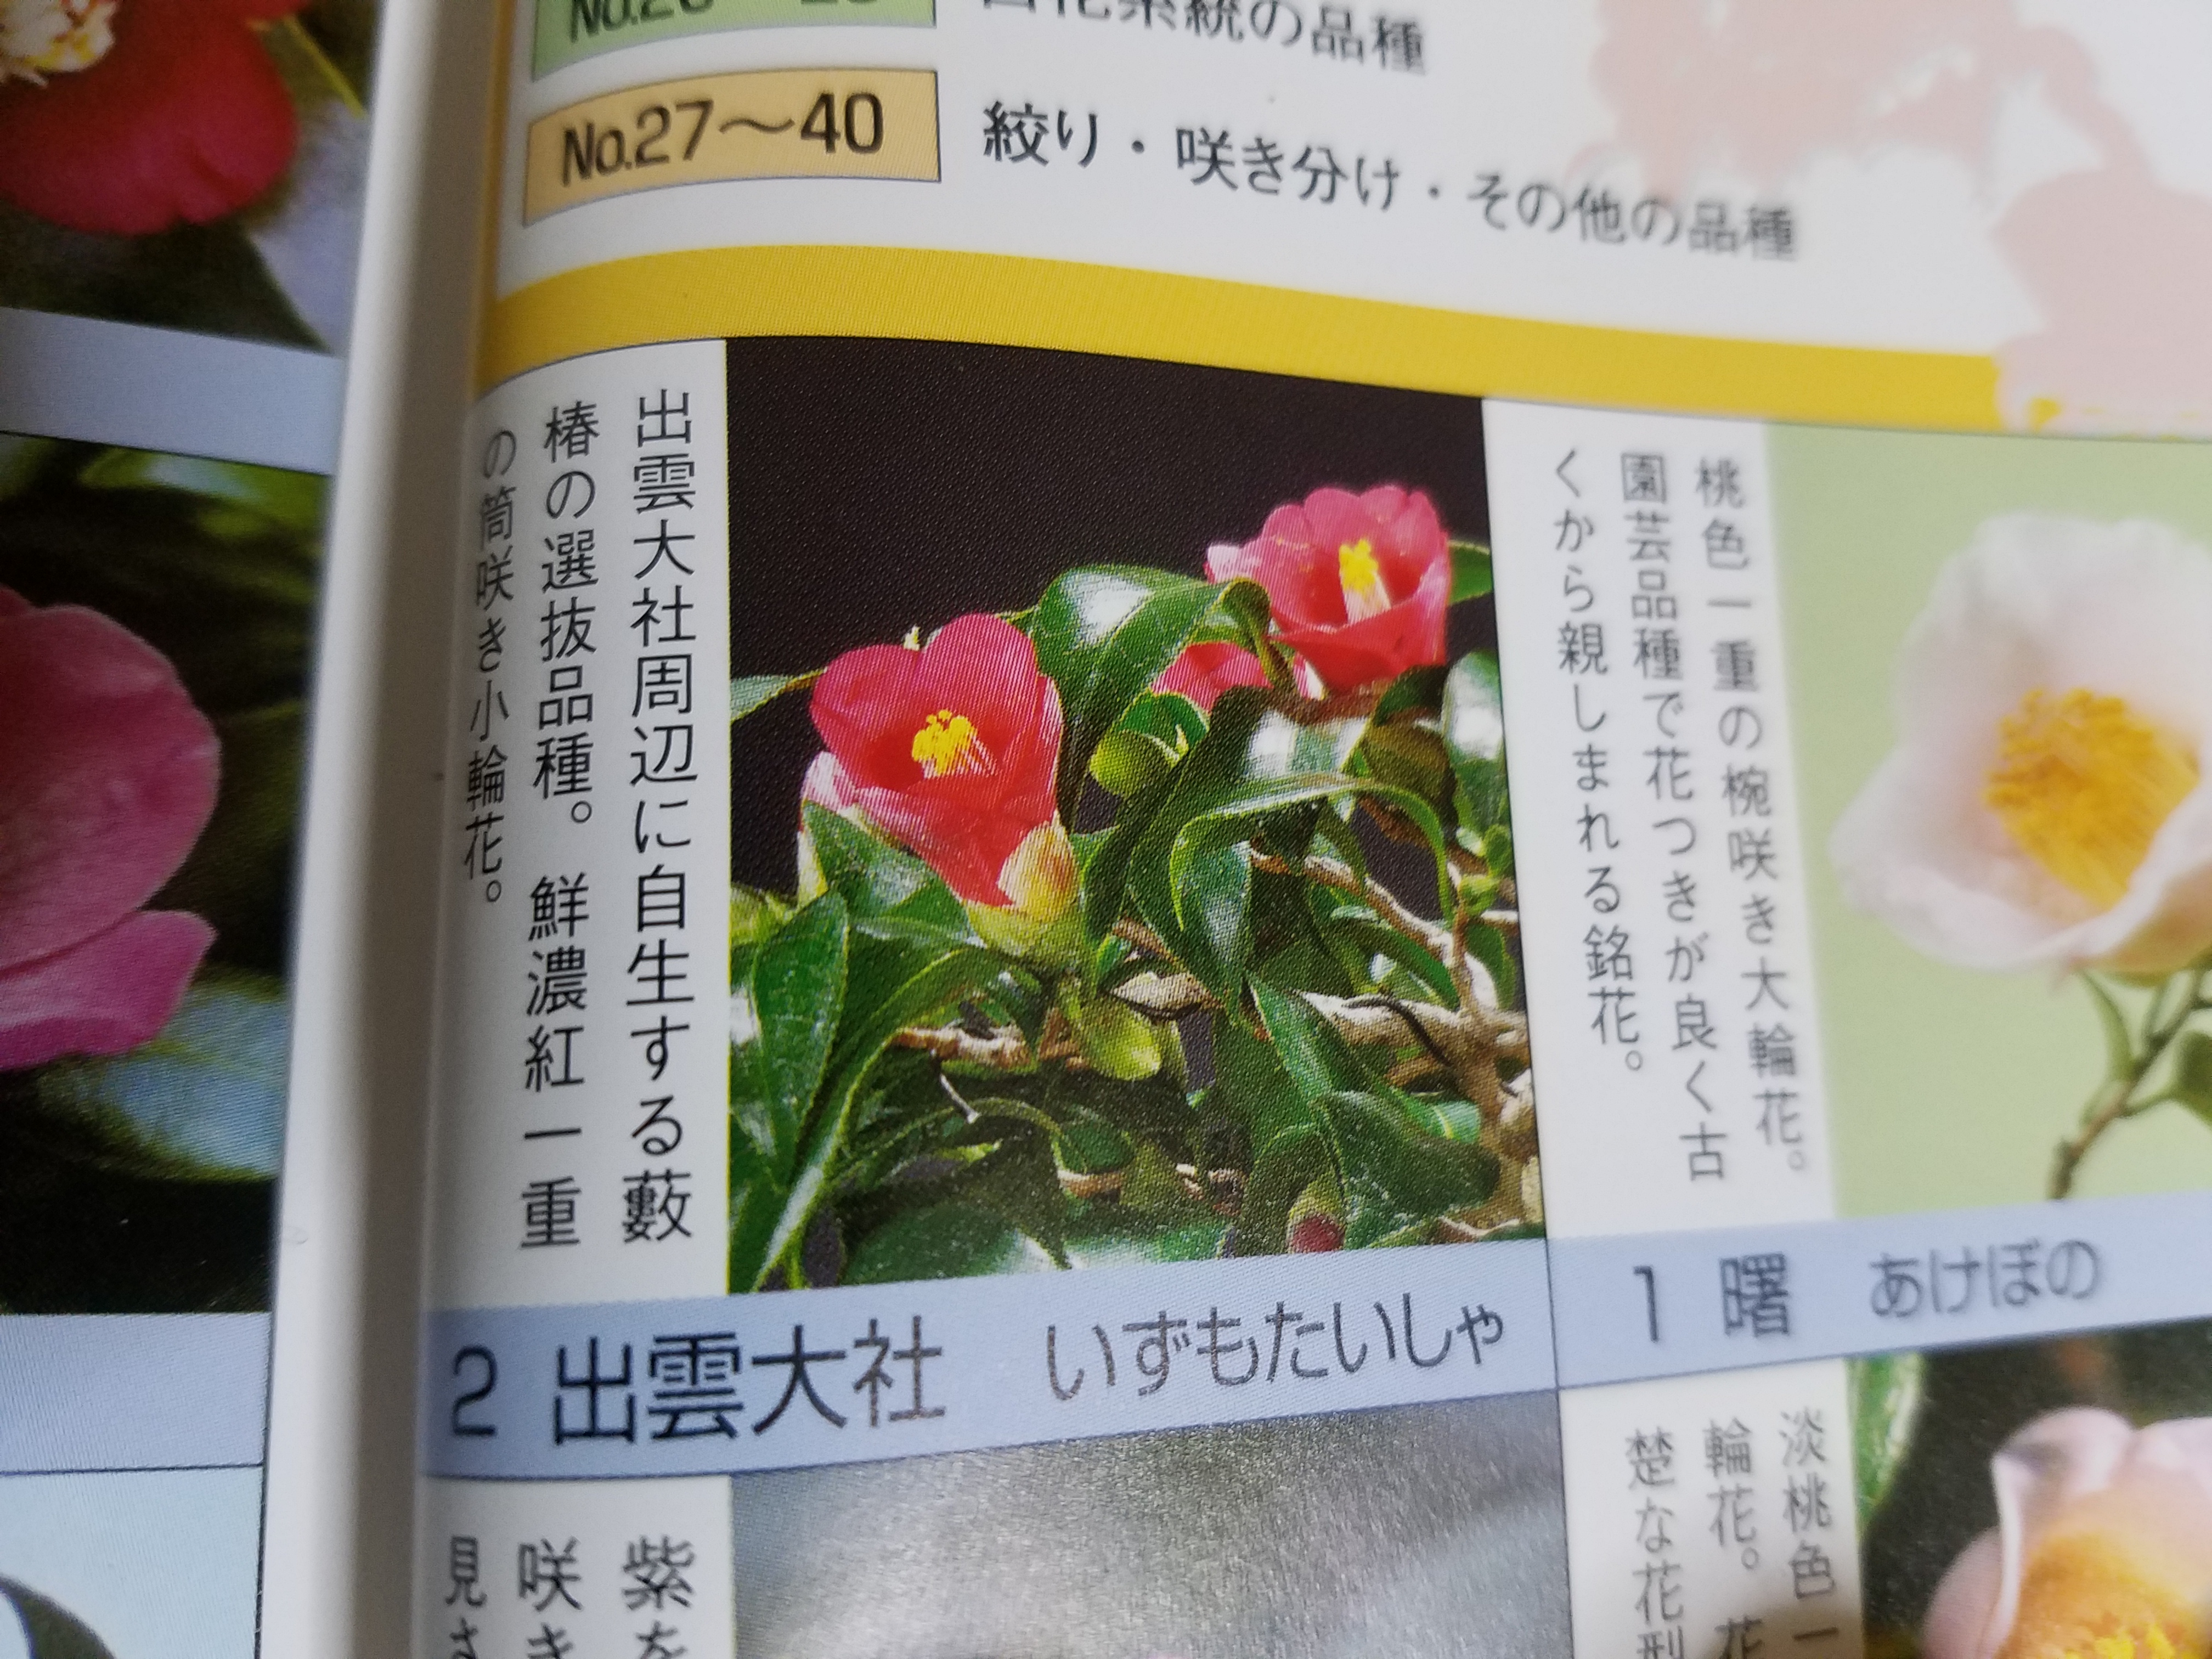
The variety is “izumotaisha” (いずもたいしゃ, 出雲大社). Unfortunately I lost the tag but I was able to re-verify the variety from a tsubaki book I picked up at the Kinbon vendor table. Another huge incentive for me to study and learn Japanese is to be able to read the books here. Japan undoubtedly has a high level of horticultural and aesthetic mastery from practicing bonsai for so many generations. Although bonsai is very much a “hands on” learning practice, I can’t cover the same ground from shear trial and error. There’s a wealth of printed information here and I hope after a few years worth of kanji I can access it better.

The tree as acquired. Many leaves were already cut in half. Because the leaf size of this variety is already small for camellia I can’t imagine it was done so for aesthetic purposes. Likely it was done for repotting which I will discuss next.
As an evergreen species, camellias do not drop leaves during the dormant season. This means when we work the roots we need to compensate by performing partial or full defoliation of the tree. For this tree, I’m doing the former. Full defoliation generally should only be done on very strong vigorous trees. Defoliation reduces the transpiration stress on the tree and can allow plant to properly recover from repotting.
As opposed to uniformly defoliating the tree, we can remove more from stronger regions and less from weaker areas to balance the tree. As I grow out and develop this camellia I want to preserve the inner buds so the design remains full and not leggy.
At the end of each shoot there is a strong terminal bud with pair of adjacent leaves. We call this “ome.” At the ome, the leaves attached to the strong terminal bud are cut entirely. This helps direct energy to the weaker and dormant interior buds.

The inner leaves and the dormant bud at each petiole’s base can be referred to as “kome.” We want to direct more energy to these buds so the leaves at the kome are only cut in half. Most of which were already cut so I left them as is.

In addition to the dormant buds at every petiole I found some inner backbuds. I’d like to preserve these and allow them to develop too.
The weakest and smaller leaves were left as is. After finishing the scissor work, we can work the roots.

Camellia roots are quite tender and brittle. Careless raking or prodding will just tear out large chunks. Carefully work and tease out the roots to keep them intact.
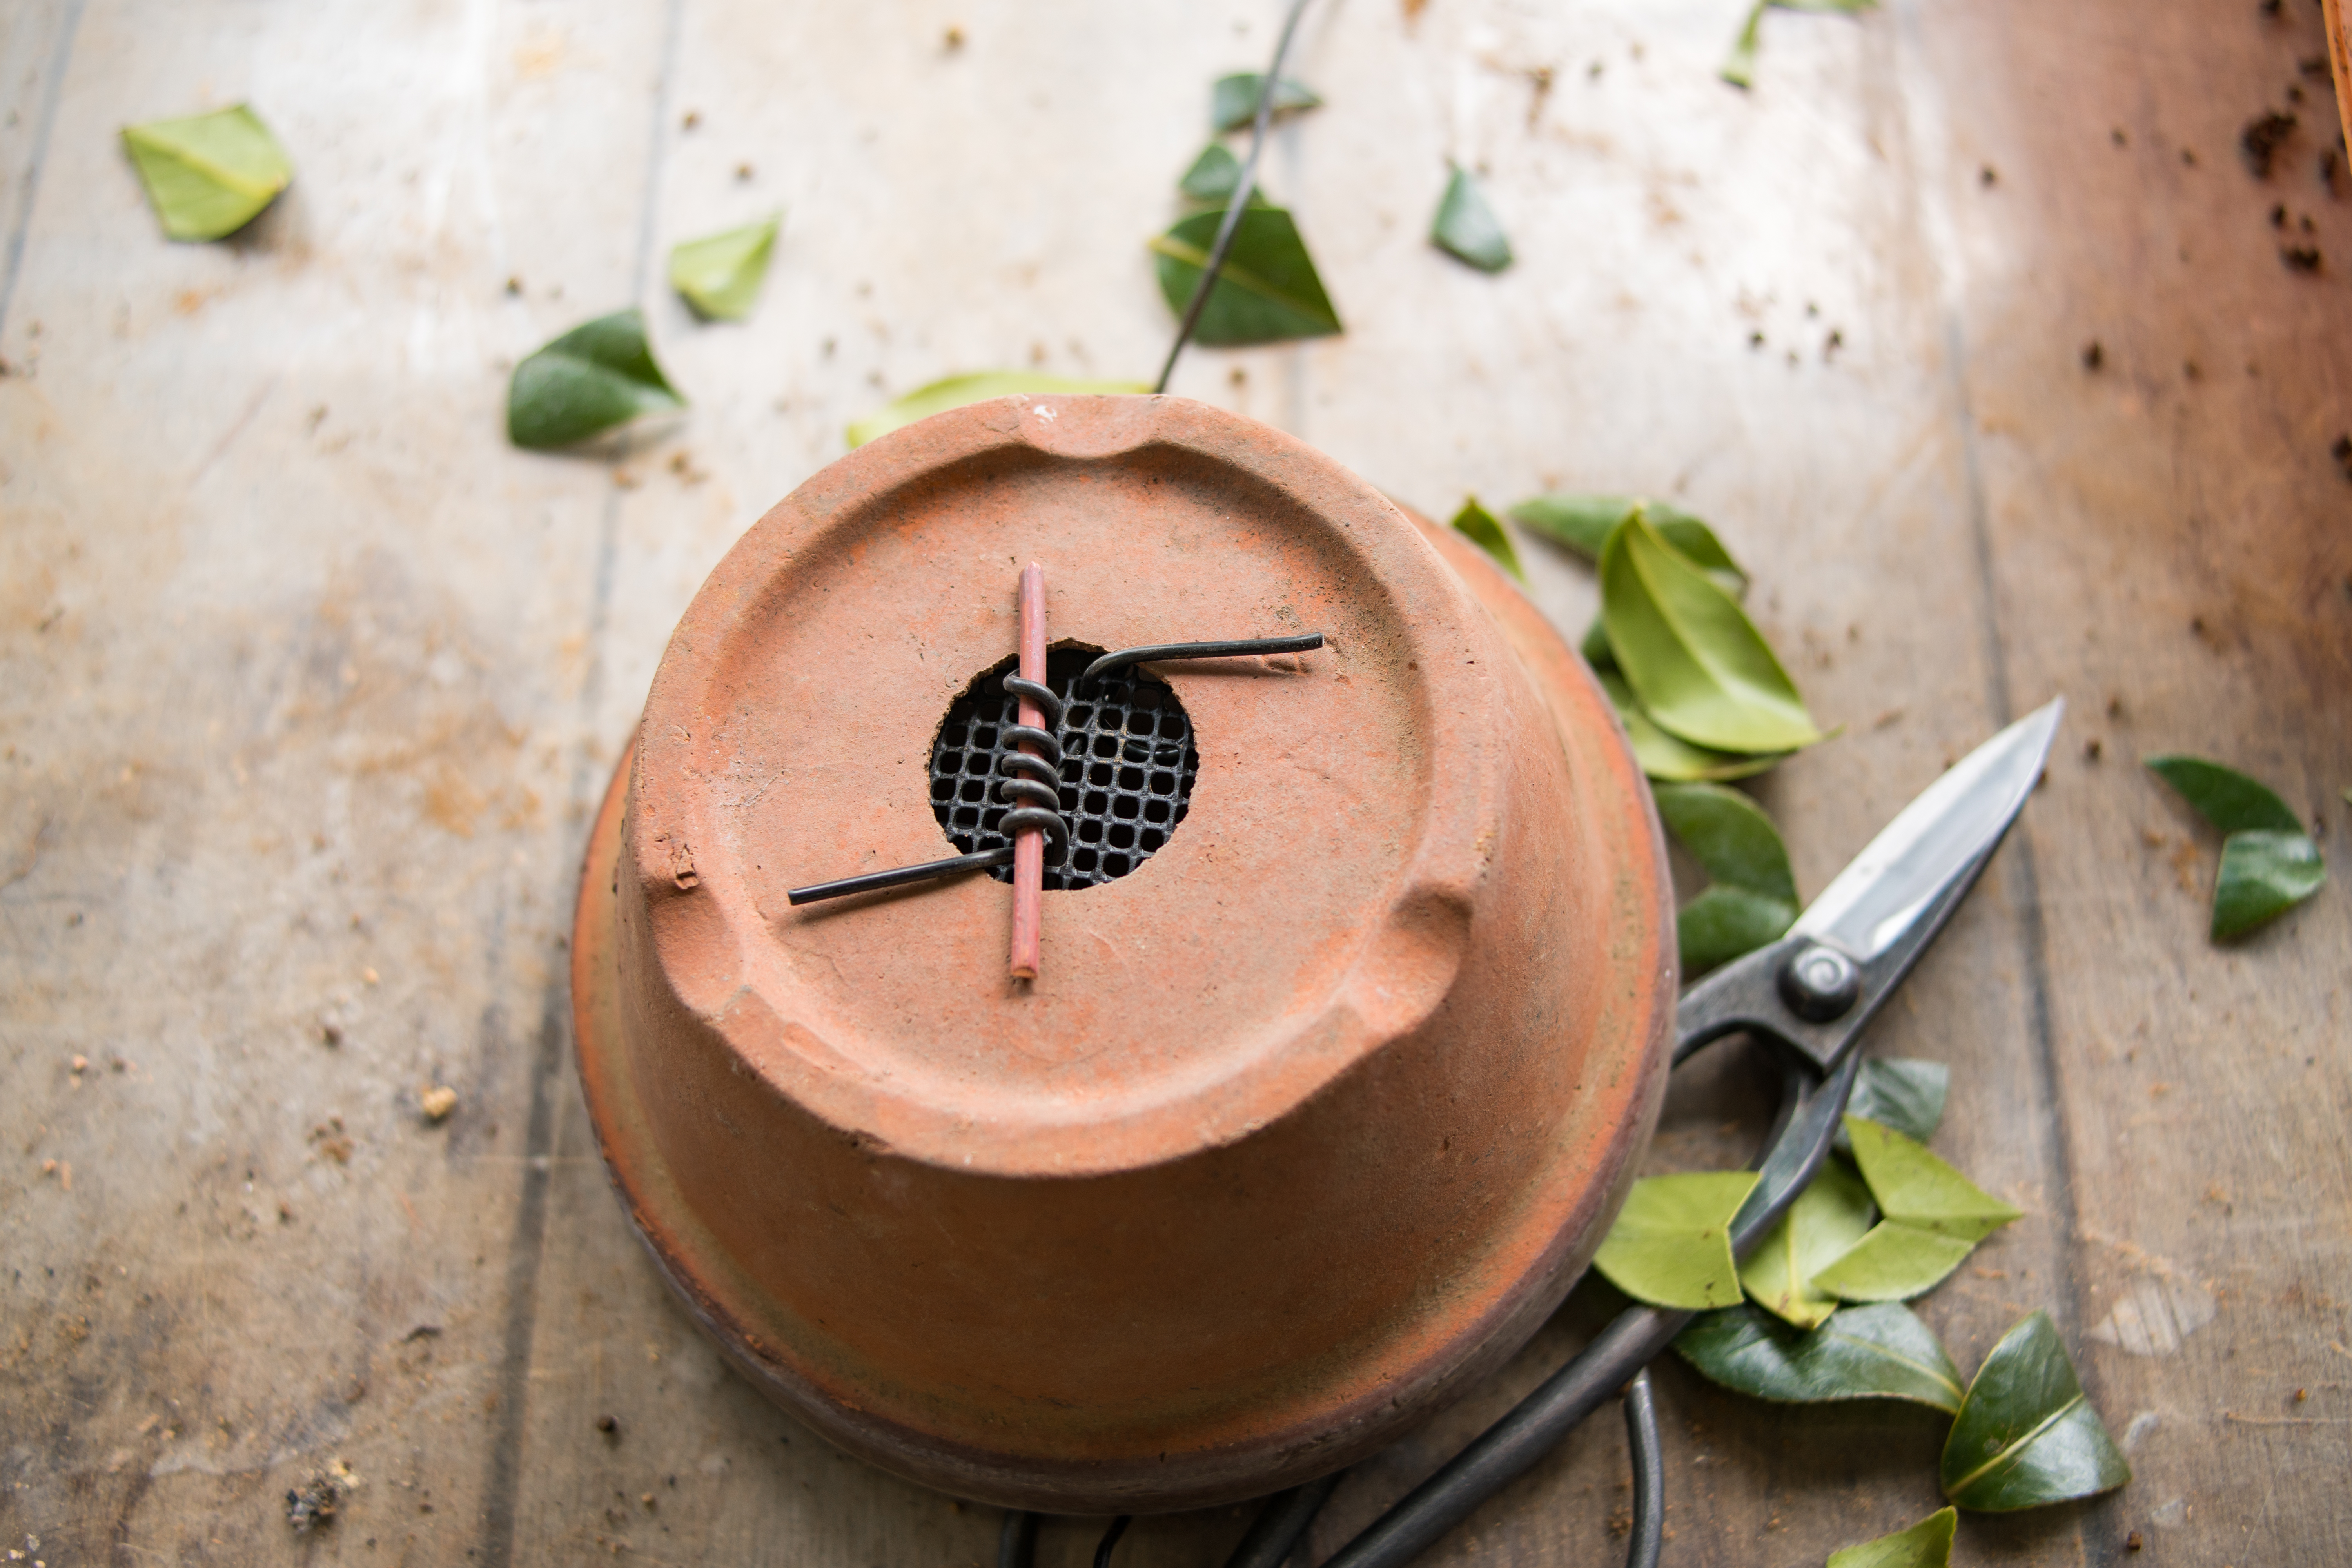
I want to let the tree grow out more and thicken the trunk, so I removed it from the cheap production pot into a larger terra cotta pot. Since there is only one drain hole an anchor needs to be made. I used a piece of thicker gauge copper wire from the scrap bin.
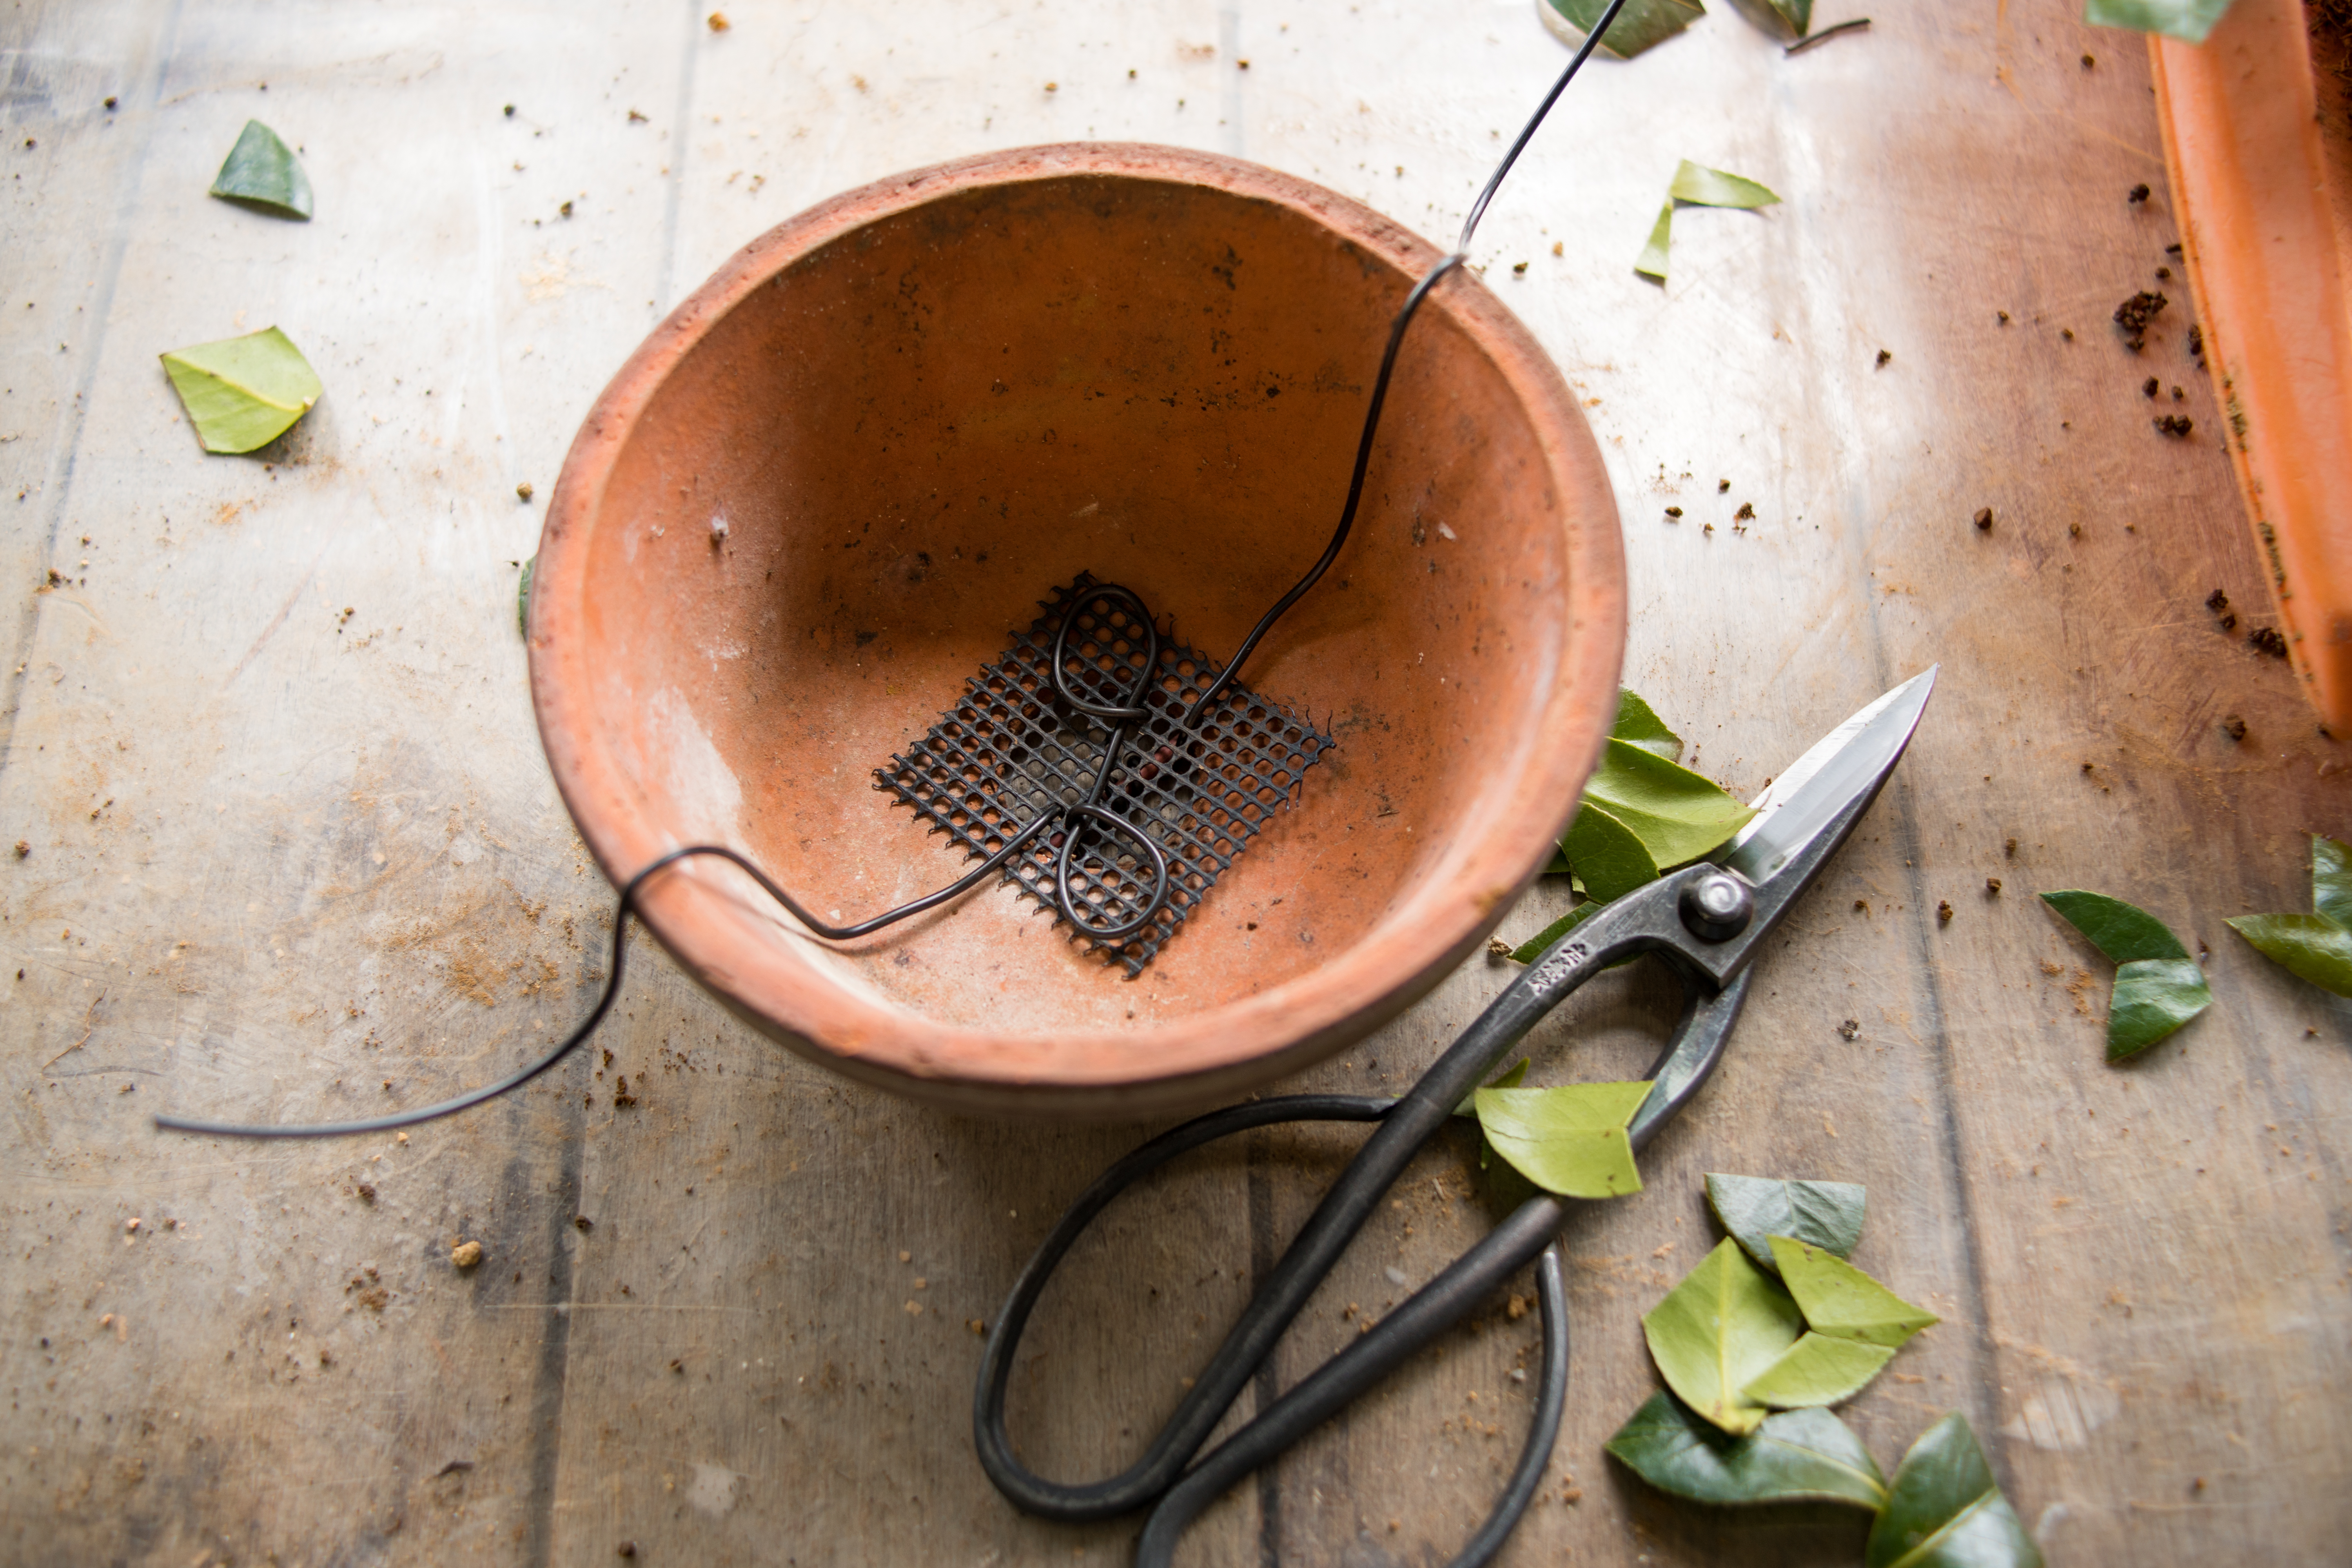
Tie down, anchor, and drainage mesh set.

The result! I’m quite excited to develop this tree and to learn more about camellia cultivation for bonsai in general. I will post updates as this tree develops.
I’ve been thinking a lot recently. What does bonsai mean to me and what am I doing in Japan? Tempted by an elusive apprenticeship and a deep passion driving me forward I took the jump and now I’m here. A relatively spacious, but run down riverside apartment in Osaka prefecture. Of a 30 day month, I get 2 off–typically spent catching up on rest, getting a haircut, and cleaning my apartment. It’s been challenging in some aspects, but so far manageable. Life has become very routine and since every day is spent working and learning something new my mind doesn’t have much time to wander.
Coming to Japan has been challenging for a few reasons. Of course, the apprenticeship itself which does not need to be overstated. Language, both inside and out of the nursery, is a big one.
Small interactions in Japanese, which should be easy, can become a big mental drain and make getting through the day much harder. My worst interaction to date is when I accidentally dropped a 10 yen coin on my way to the convenience store. I had a habit of saving all my spare change and then using it all to near exact cost to cover the price of a bento. I was paying for a bento (already placed in the microwave) and after handing the clerk money I was promptly alerted that I was a few yen short. I had no other money on me and it was about 35 seconds too late to place it back in the refrigerated aisle. The clerk asked me what I wanted to do and what ensued was a butchered attempt in explaining that I would be back with the yen in 10 minutes. The clerk ended up using some of her own money so the register could pop open. I felt incredibly embarrassed and mashed the pedals on my mamachari back to Kouka-en to look for any forgotten change in my backpack. I ended up finding a 50 yen coin, came back to the combini and gave it to the clerk who was a bit perplexed. She asked me if it was okay in Japanese and was offering me change but I said it was fine and quickly left.
Thankfully situations like that are rather rare and my Japanese has improved significantly since arriving to Japan. Some days are better than others, and its an ongoing process to teach myself and improve.
The last aspect which is rather understated and something that took me time to understand was the transition from hobbyist to aspiring professional. As a hobbyist I’m only bound to my standards as the determining factor of whether something is good or if I enjoy it. As an aspiring professional my work is subject to the scrutiny of my peers, Oyakata, and hopefully would be future customers. Of course this is quite obvious and its why I’m pursuing an apprenticeship, but it didn’t really set in until recently. In light of this I’ve been trying to keep my mind open, study as much as I can, and learn as much as possible. 6 months in and many practice trees later I’m beginning to understand some of my bad habits as well as slight nuances that make a design better. I’ve been very transparent about my work and looking back I know many of my old projects are not good. I have a long ways to go but I am happy to have made some improvement to be able to continue to do so.


As a last bit of self reflection in pursuing bonsai I not only want to improve and grow my work but to mature and grow as a person. Perhaps they go hand in hand. But as much as I mean that, quite contradictorily, I just want to be content with who I am.
To my old and new followers thanks for reading! Feel free to leave a comment or shoot me an email!
Its hard for me to write often, but I’m active on my Facebook and instagram and regularly post pictures: